


🎶 文章简介:【SpringBoot 】策略模式 之 一键切换云存储方式
💡 创作目的:将策略模式的思想融入到java编码中,更加便捷的实现文件上传方式的切换。阿里云Oss对象存储、腾讯云Cos对象存储、七牛云Kodo对象存储以及本地文件存储 之间的快速切换。
☀️ 今日天气:2022-12-05 天气晴
📝 每日一言:忘掉拥有过的花,去种有结果的树。
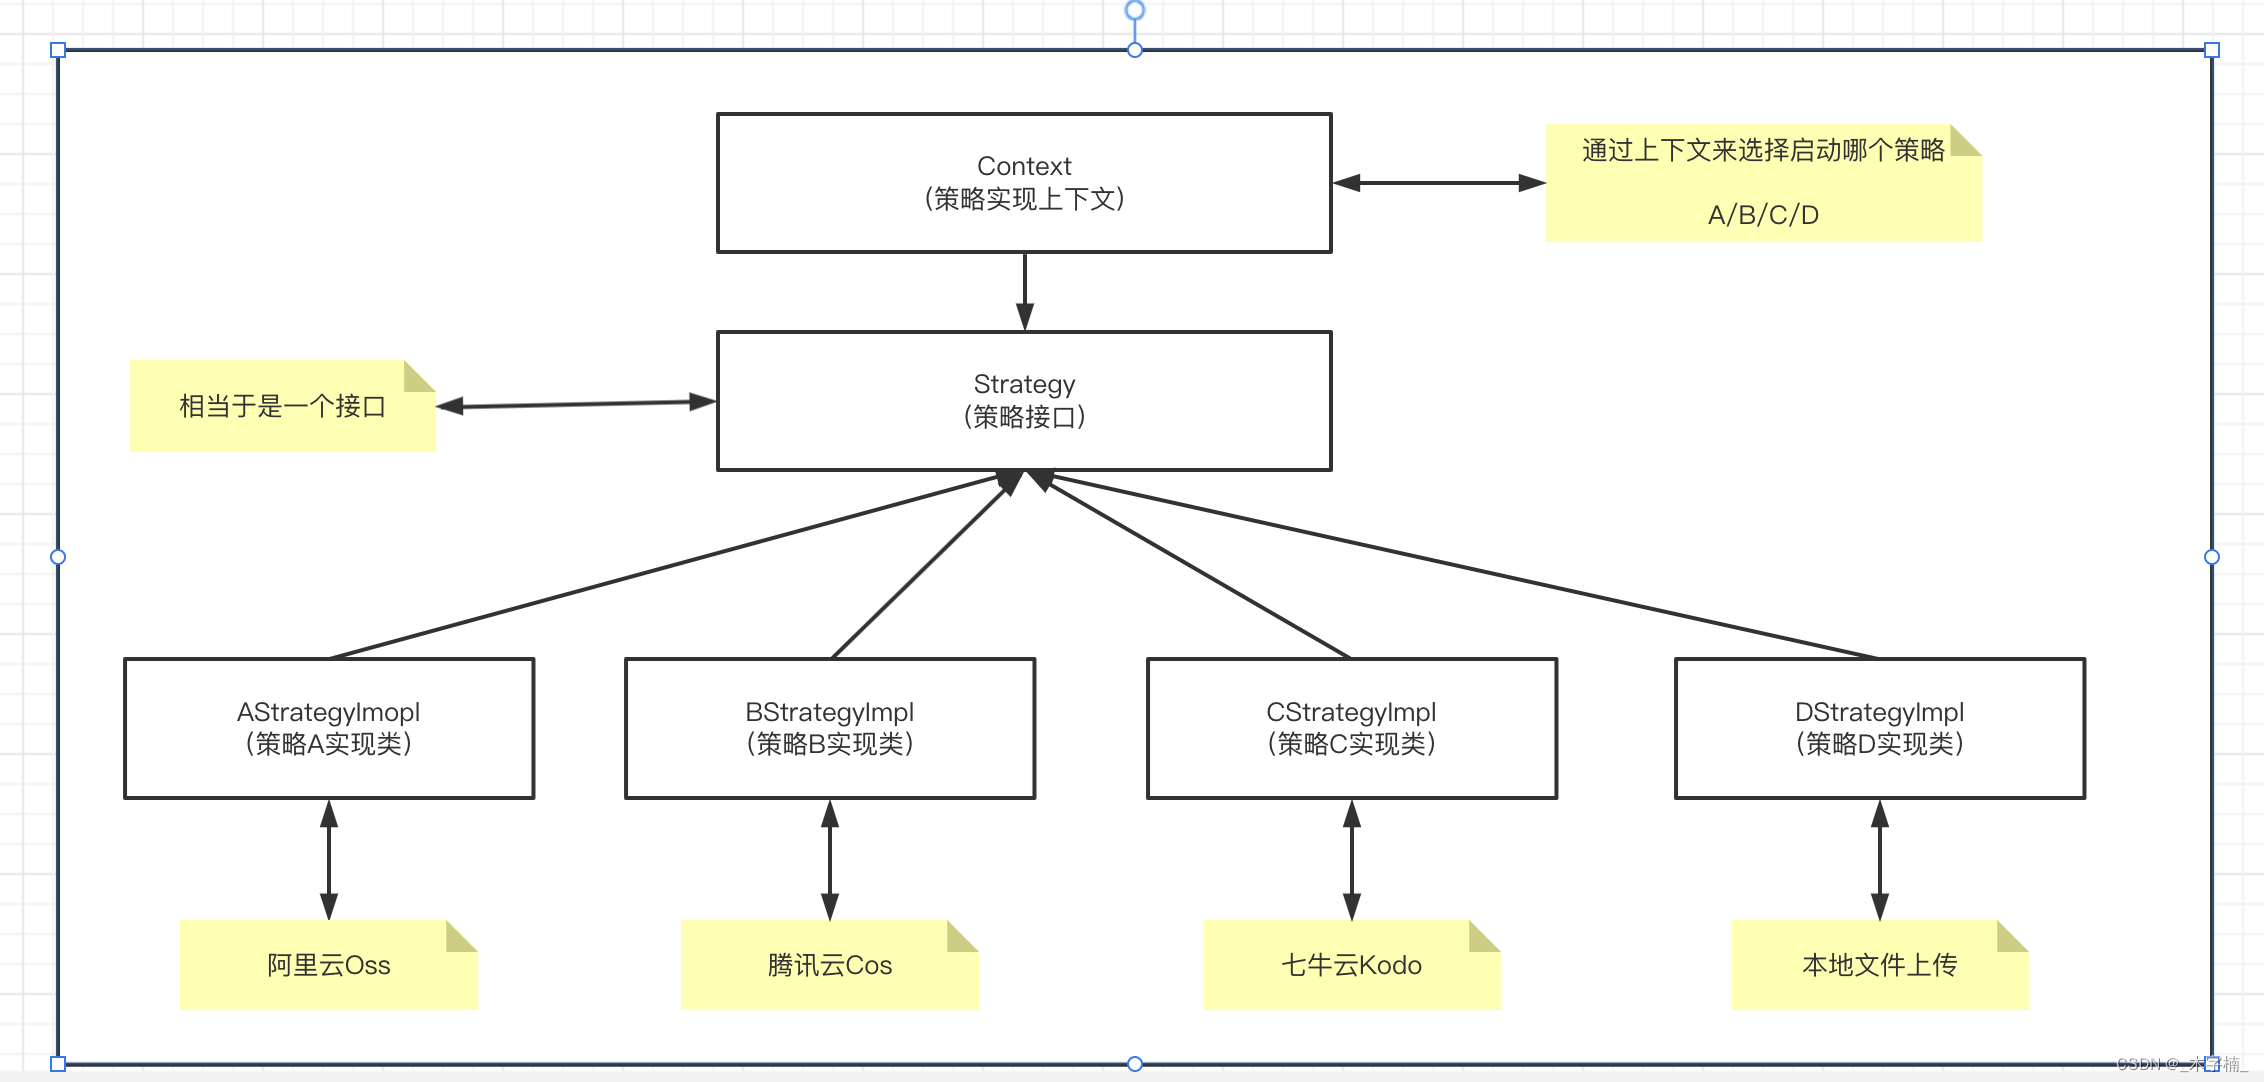
策略模式是指有一定行动内容的相对稳定的策略名称。策略模式在古代中又称“计策”,简称“计”,如《汉书·高帝纪上》:“汉王从其计”。这里的“计”指的就是计谋、策略。策略模式具有相对稳定的形式,如“避实就虚”、“出奇制胜”等。一定的策略模式,既可应用于战略决策,也可应用于战术决策;既可实施于大系统的全局性行动,也可实施于大系统的局部性行动。
上面的概述可能大家会看的摸不着头脑,简单来说就是:
- 我们定义一个接口(就比如接下来要实现的文件上传接口)
- 我们定义所需要实现的策略实现类 A、B、C、D(也就是项目中所使用的四种策略阿里云Oss上传、腾讯云Cos上传、七牛云Kodo上传、本地上传)
- 我们通过策略上下文来调用策略接口,并选择所需要使用的策略
上面就是策略模式的简单概述,光说不练假本事,那么我们接下来就新建一个项目来实际演练一下。
🦜 2-1、SpringBoot项目的基本搭建
关于SpringBoot项目的搭建这里就不做过多的概述,我这里已经新建了一个基础的SpringBoot项目。

🦩 2-2、策略接口的编写
首先我们新建一个名称为
strategy的文件夹(在代码规范中,使用设计模式要明确的体现出来,便于后期维护)
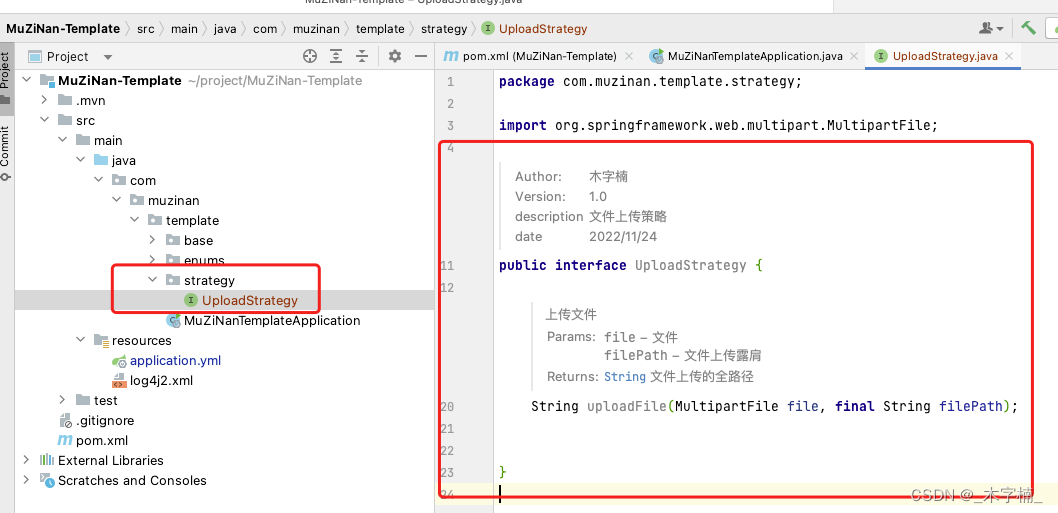
如下就是我们的策略接口了,接下来我们去编写对应的实现类。
public interface UploadStrategy {

    /**
     * 上传文件
     *
     * @param file        文件
     * @param filePath    文件上传露肩
     * @return {@link String} 文件上传的全路径
     */
    String uploadFile(MultipartFile file, final String filePath);

}
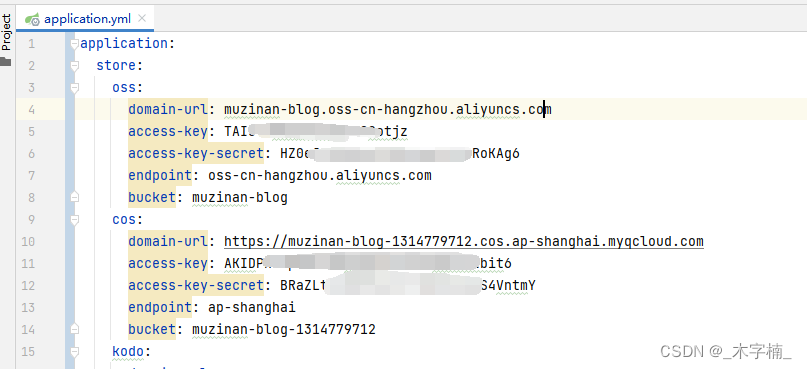
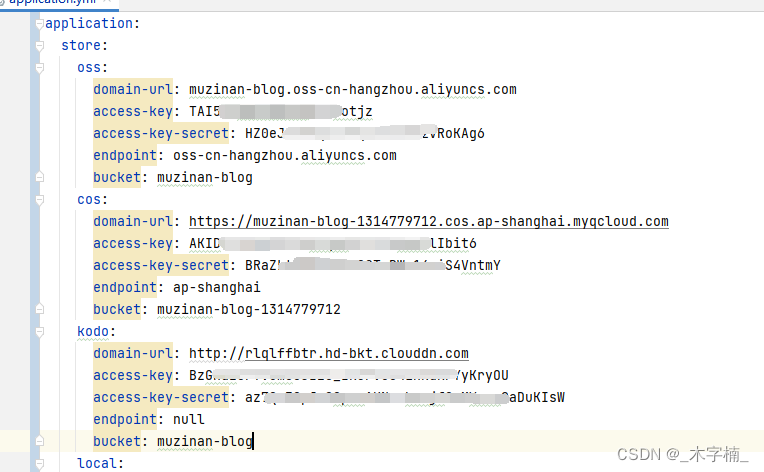
🦚 2-3、完善配置文件
在编写对象存储实现类之前,我门会发现一个问题。我们需要去对应的云服务厂商开通对象存储服务,然后获取到
accessKey、accessKeySecret、endpoint、bucket、domainUrl等必须的参数。 因为这些信息基本是不会发生改变,所以我们可以将这些信息存储在配置文件中。 除此之外我们还需要对文件上传进行配置,设置为最大文件为100MB
server:
  port: 8080

spring:
  servlet:
    multipart:
      max-file-size: 100MB
      max-request-size: 100MB

application:
  store:
    oss:
      domain-url: *********
      access-key: *********
      access-key-secret: *******
      endpoint: *******
      bucket: *******
    cos:
      domain-url: *******
      access-key: *******
      access-key-secret: *******
      endpoint: *******
      bucket: *******
    kodo:
      domain-url: *******
      access-key: *******
      access-key-secret: *******
      endpoint: *******
      bucket: *******
    local:
      domain-url: *******
      access-key: *******
      access-key-secret: *******
      endpoint: *******
      bucket: *******
配置文件的格式如上,我们获取配置文件的时候可以使用@Value()的注解进行获取。
嗯?不会吧不会吧?不会真的有人用@Value去一个一个获取吧? 优秀的我们肯定不会用这么Low的方式,在这里呢我们使用@ConfigurationProperties()的方式来获取配置文件的内容。
首先我们引入自定义配置依赖 以及 云服务依赖
    <!--==============  项目版本号规定 ===============-->
    <properties>
        <!--==============  对象存储依赖  ==================-->
        <cos.version>5.6.89</cos.version>
        <kodo.version>[7.7.0, 7.10.99]</kodo.version>
        <oss.version>3.15.1</oss.version>
    </properties>

    <dependencies>
       <!-- 自定义配置 -->
        <dependency>
            <groupId>org.springframework.boot</groupId>
            <artifactId>spring-boot-configuration-processor</artifactId>
        </dependency>
        <!--================== 对象存储依赖 =======================-->
        <!-- 腾讯云Cos对象存储 -->
        <dependency>
            <groupId>com.qcloud</groupId>
            <artifactId>cos_api</artifactId>
            <version>${cos.version}</version>
        </dependency>
        <!-- 七牛云Kodo对象存储 -->
        <dependency>
            <groupId>com.qiniu</groupId>
            <artifactId>qiniu-java-sdk</artifactId>
            <version>${kodo.version}</version>
        </dependency>
        <!--阿里云Oss对象存储-->
        <dependency>
            <groupId>com.aliyun.oss</groupId>
            <artifactId>aliyun-sdk-oss</artifactId>
            <version>${oss.version}</version>
        </dependency>
    </dependencies>
我们编写properties实体类,通过@ConfigurationProperties()注解可以将配置文件中的内容读取到实体类中。 实体类中由于类继承关系
不要使用@Data注解,而要使用@Getter和@Setter,某则可能会出现问题。 除此之外还要注意配置目录的对应关系。
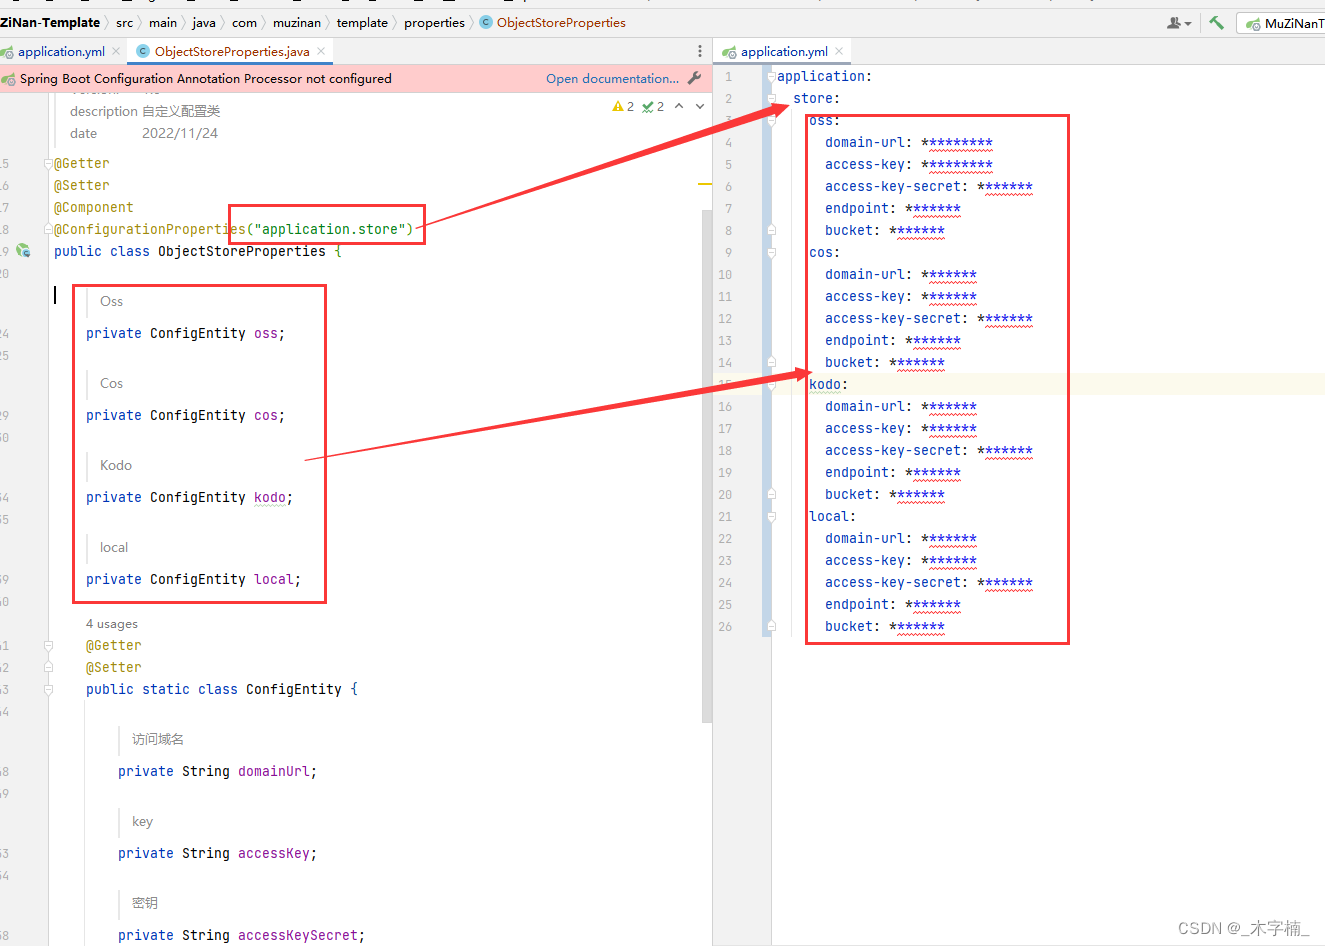
@Getter
@Setter
@Component
@ConfigurationProperties("application.store")
public class ObjectStoreProperties {

    /**
     * Oss
     */
    private ConfigEntity oss;

    /**
     * Cos
     */
    private ConfigEntity cos;

    /**
     * Kodo
     */
    private ConfigEntity kodo;

    /**
     * local
     */
    private ConfigEntity local;

    @Getter
    @Setter
    public static class ConfigEntity {

        /**
         * 访问域名
         */
        private String domainUrl;

        /**
         * key
         */
        private String accessKey;

        /**
         * 密钥
         */
        private String accessKeySecret;


        /**
         * 地域节点
         */
        private String endpoint;


        /**
         * 存储桶名称
         */
        private String bucket;

    }
}
🦉 2-3-1、阿里云Oss配制信息完善
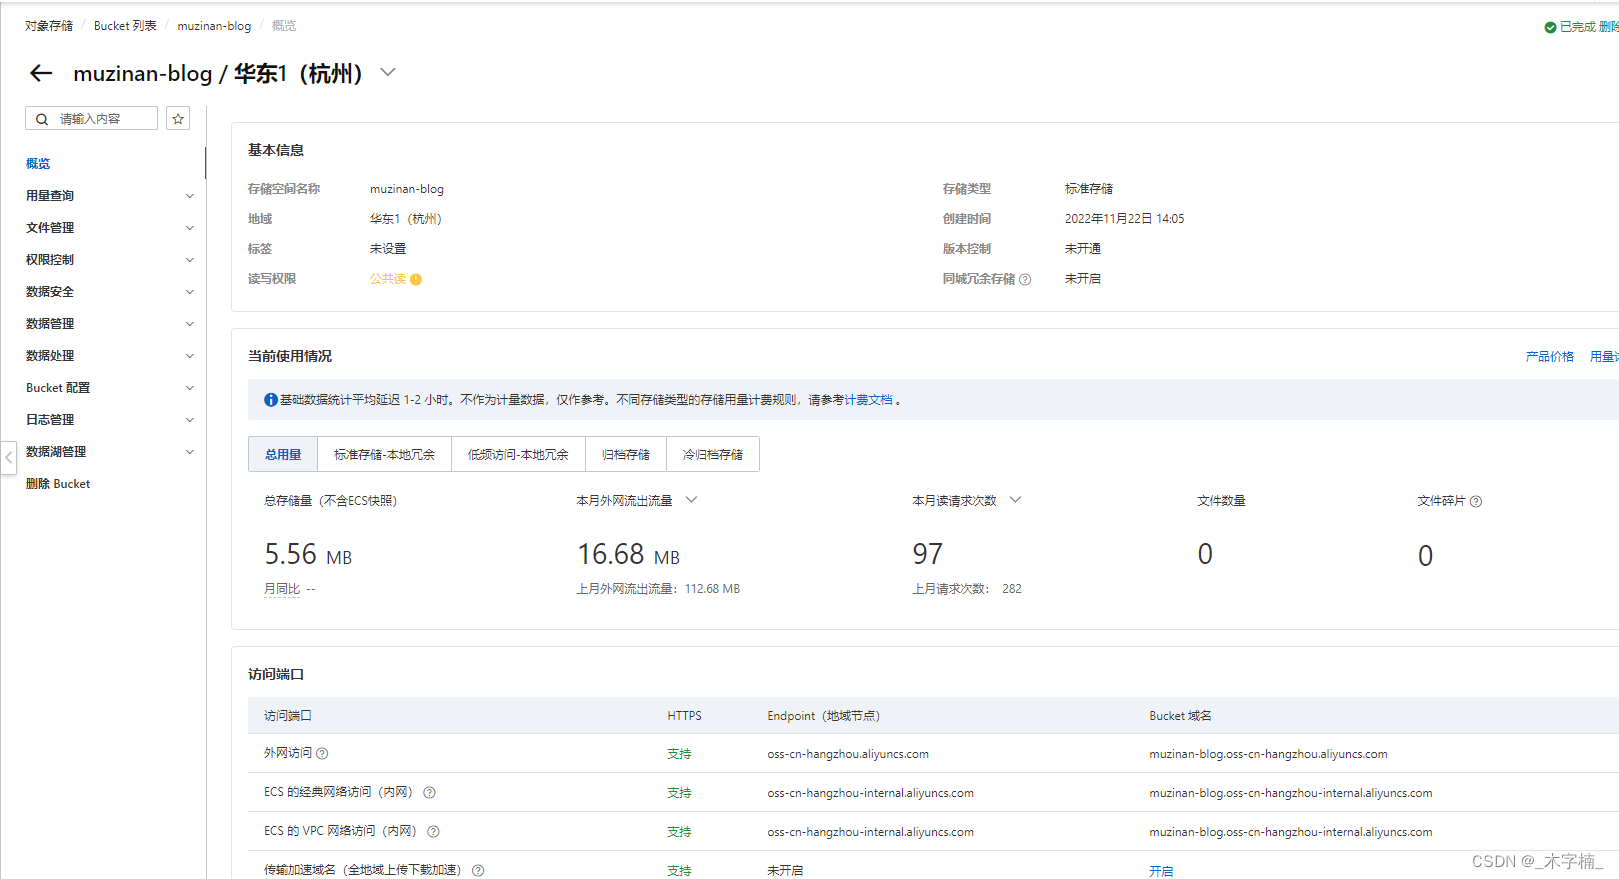
首先我们去阿里云开通对象存储服务 我这里已经创建好了一个存储桶
- endpoint:
oss-cn-hangzhou.aliyuncs.com- bucket:
muzinan-blog- domainUrl:
muzinan-blog.oss-cn-hangzhou.aliyuncs.com
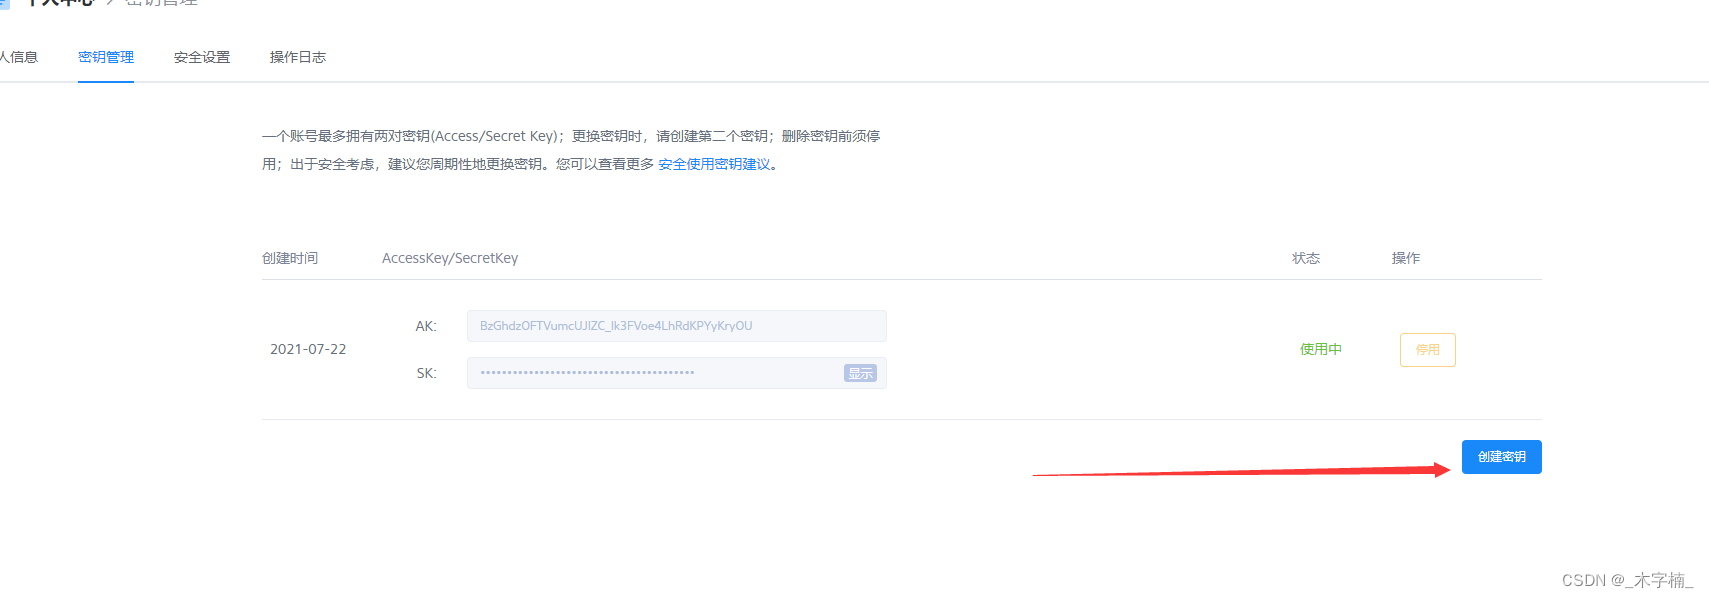
接下来我们需要去获取
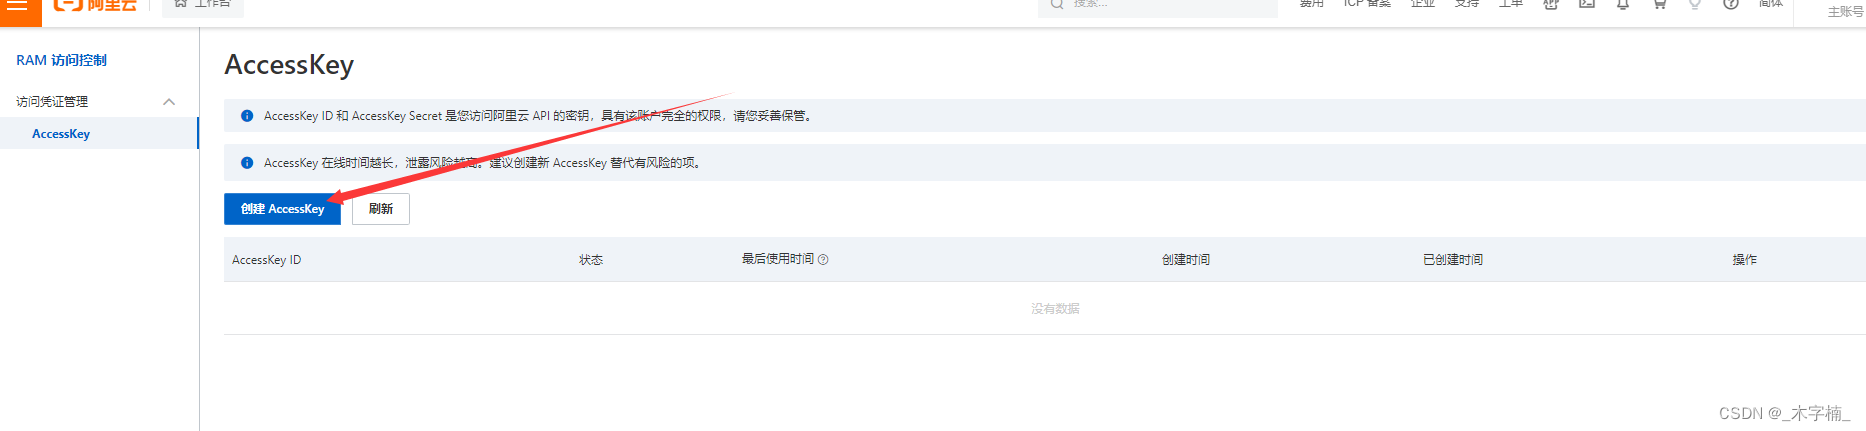
accessKey和accessKeySecret,大家可以直接使用主账户的key和密钥,但是由于主账户是拥有所有权限的,所以不要把key和密钥泄露出去.如果发现泄露,第一时间通过阿里云更换key和密钥,及时止损.
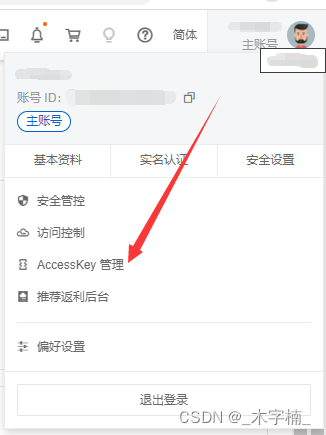
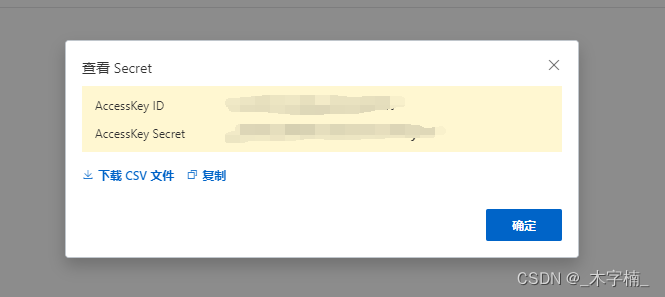
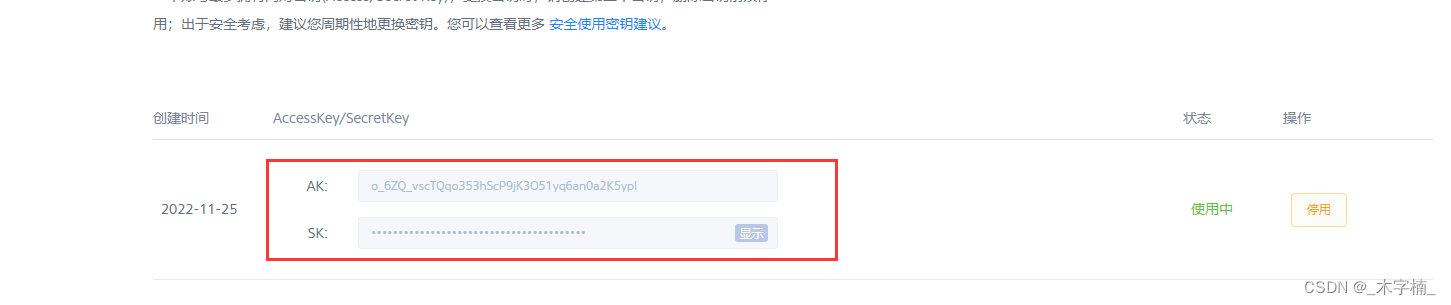
点击创建accessKey,进行验证之后就会生成accessKey 和 accessKeySecret,大家将其复制下来配置 入项目即可.
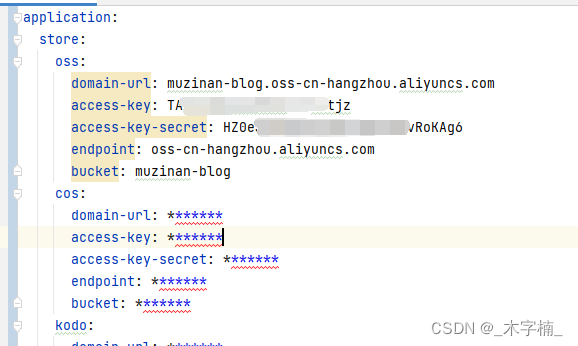
完成之后创建之后呢我们的配置文件应该是这样的
🦤 2-3-2、腾讯云Cos配制信息完善
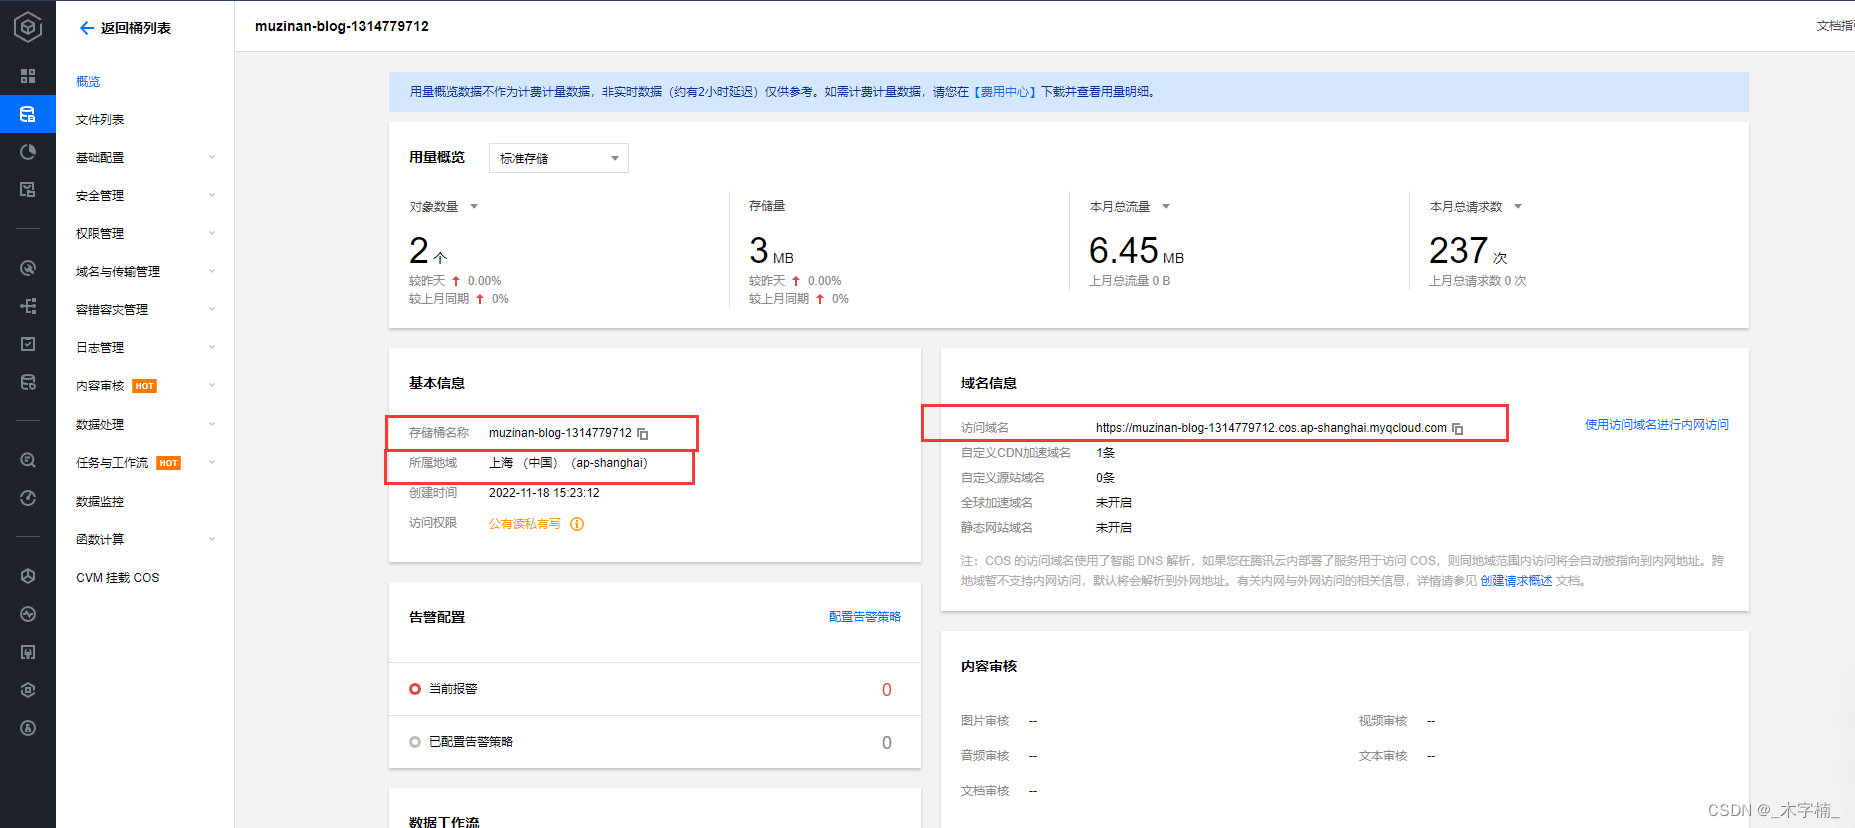
首先我们去腾讯云开通对象存储服务 我这里已经创建好了一个存储桶
- endpoint:
ap-shanghai- bucket:
muzinan-blog-1314779712- domainUrl:
https://muzinan-blog-1314779712.cos.ap-shanghai.myqcloud.com
接下来我们需要去获取
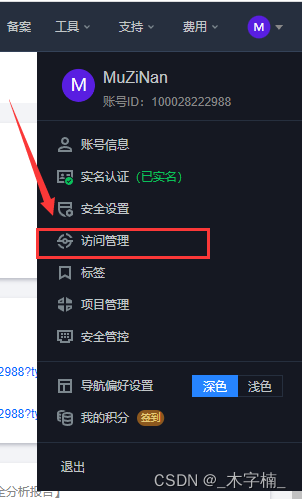
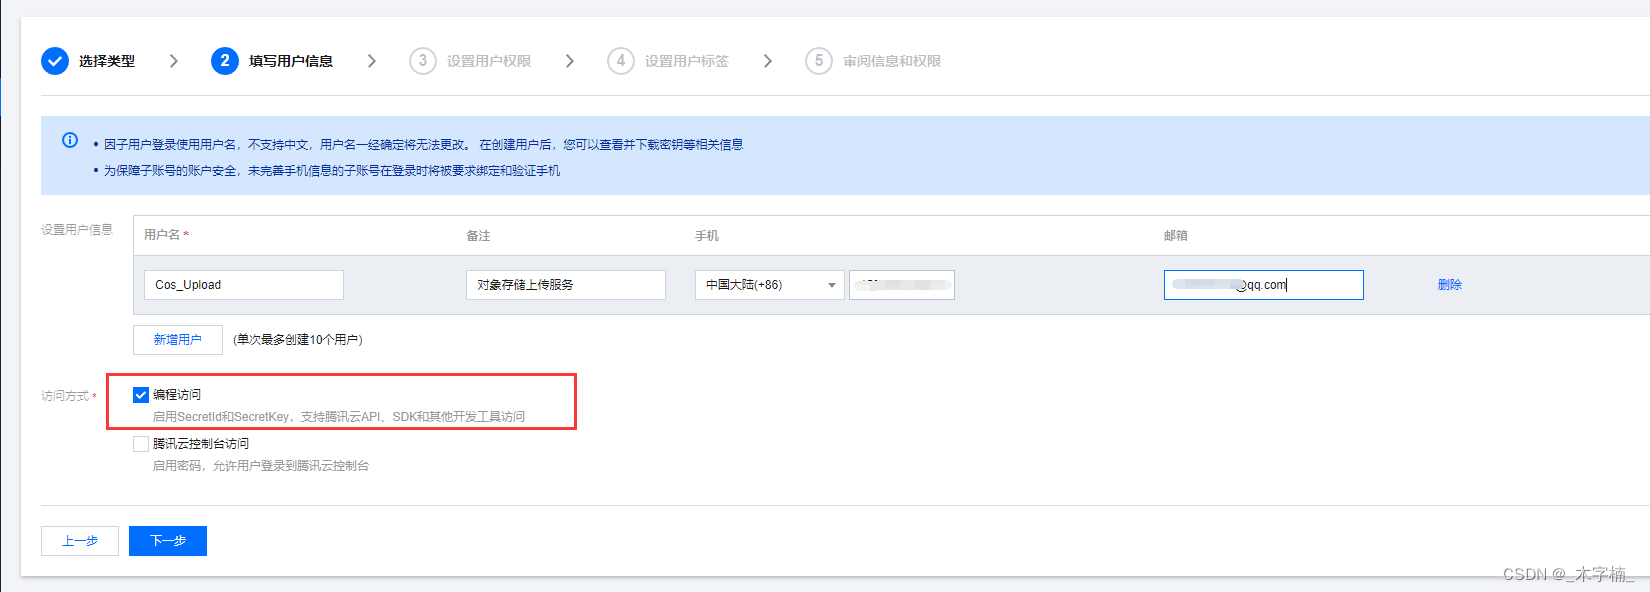
accessKey和accessKeySecret(注意事项同阿里云Oss) 这里我们就不使用主账户了,我们来新建一个子用户,并且只给子用户分配对象存储的权限,这样即使key和秘钥被泄露,最多只有对象存储服务可能会被别人恶意使用,其他服务不会收到影响。
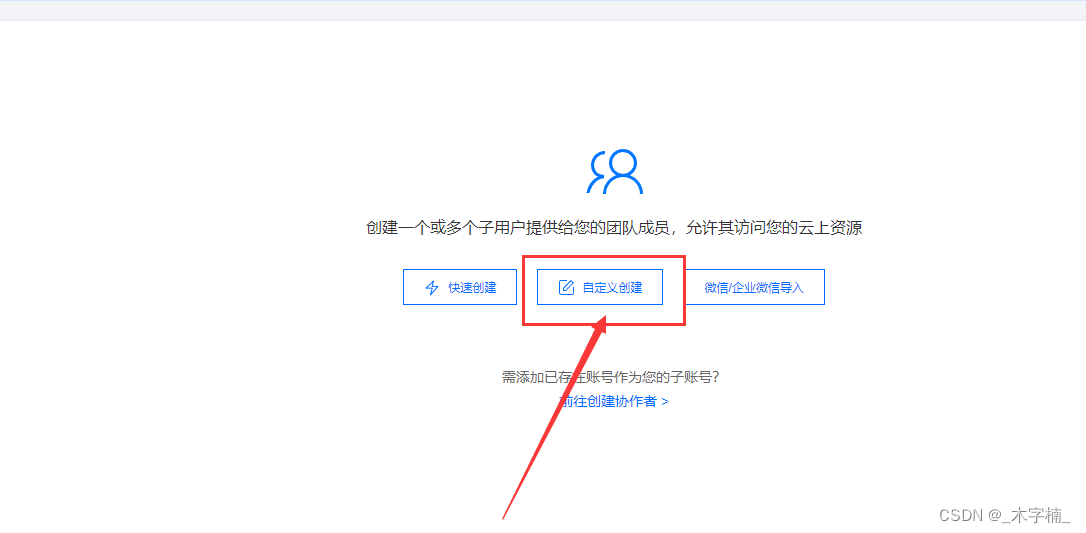
- 点击新增用户
- 点击 自定义创建
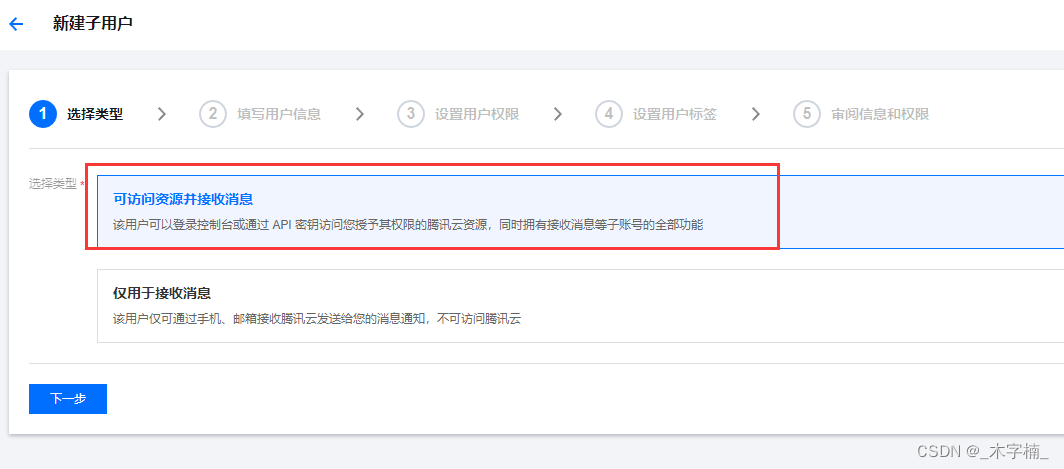
- 选择 可访问资源井接收消息
- 访问方式 选择编程访问
- 主账户验证
- 搜索Cos 选择红框内的权限赋予当前用户
- 标签可不设置
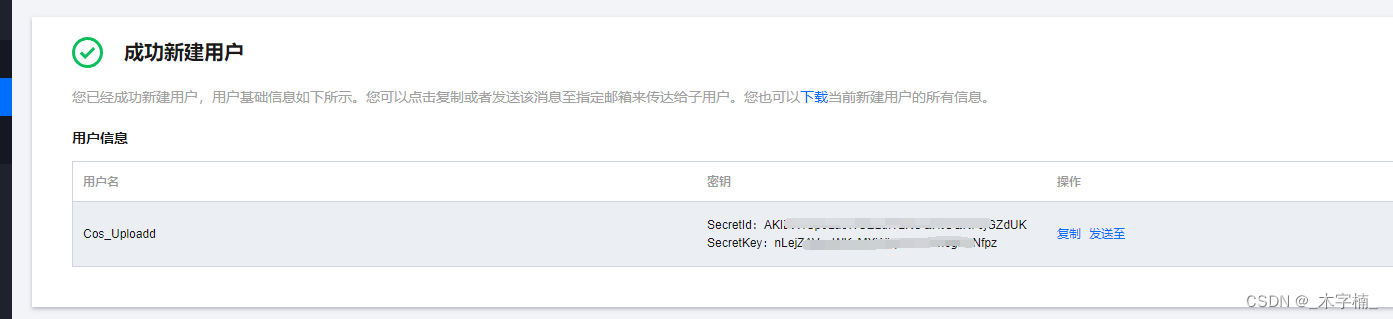
- 新建成功之后就会展示秘钥信息


完成之后创建之后呢我们的配置文件应该是这样的
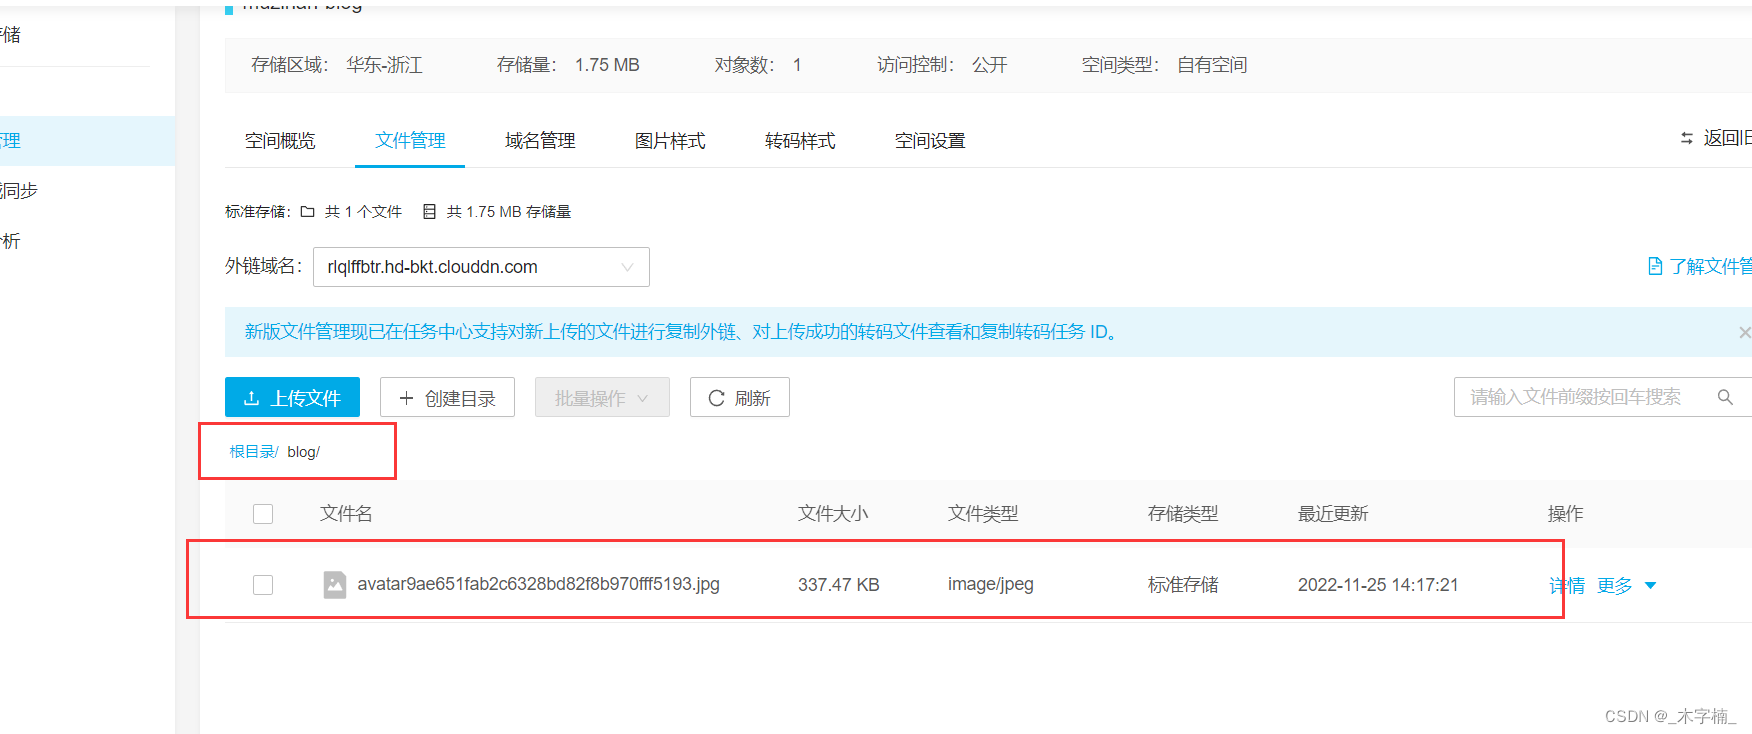
🪶 2-2-3、七牛云Kodo配制信息完善
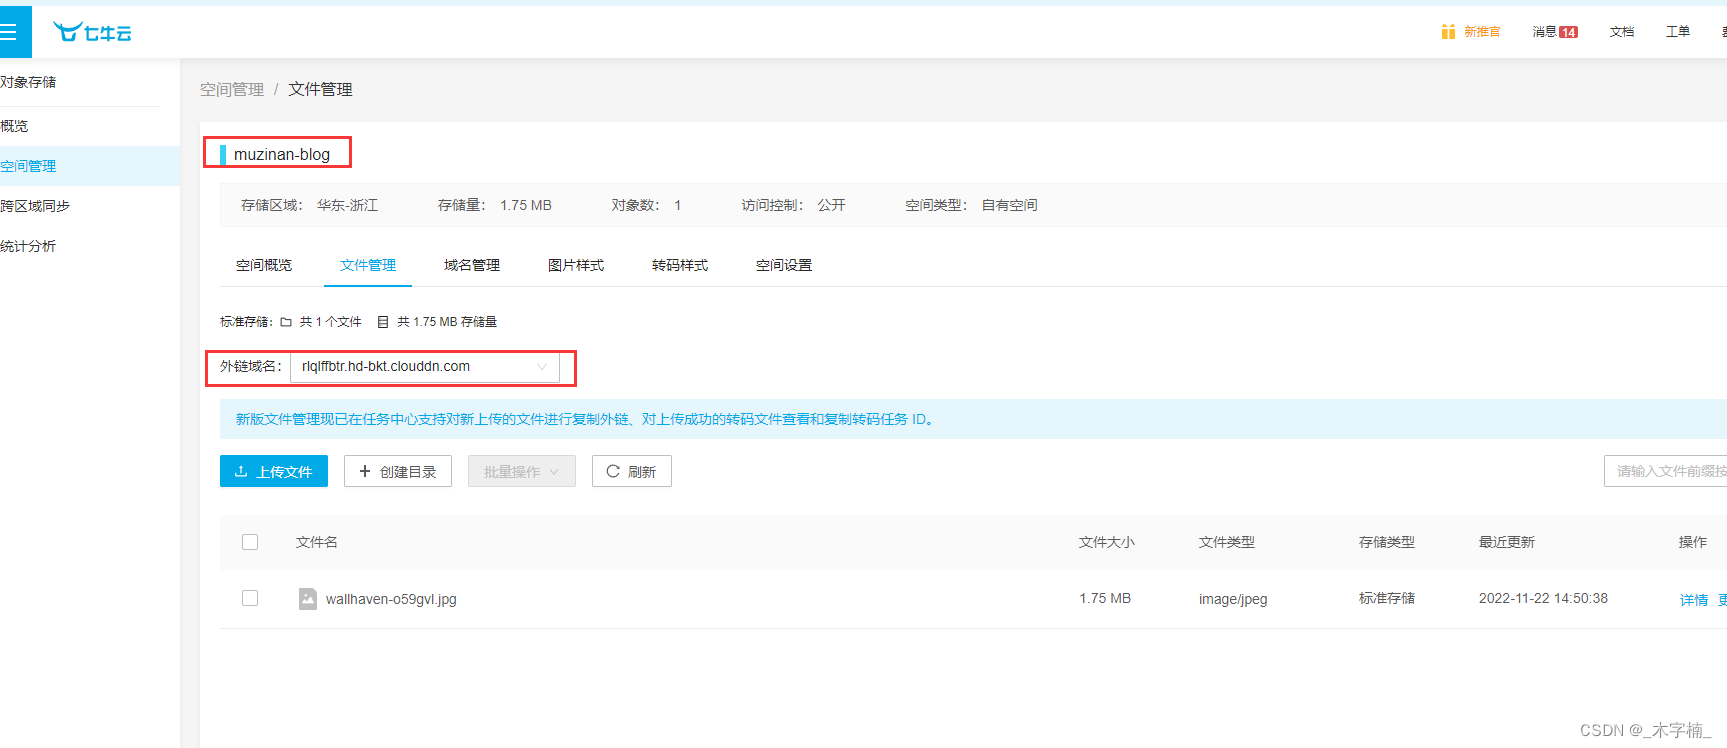
首先我们去腾讯云开通对象存储服务 我这里已经创建好了一个存储桶,七牛云不需要配制 地域节点
- bucket:
muzinan-blog- domainUrl:
http://rlqlffbtr.hd-bkt.clouddn.com
接下来我们需要去获取
accessKey和accessKeySecret,七牛云没有子用户的概念,所以我们可以直接创建秘钥。(注意点同阿里云Oss)

完成之后创建之后呢我们的配置文件应该是这样的
🐦 2-2-4、本地上传配制信息完善
本地上传目前不需要进行配置,项目上线可以进行域名配置域名配制
🐧 2-3、策略实现类内部实现
我们在进行具体文件上传策略实现之前总结一下所涉及到的功能。
- 上传对象初始化
- 文件是否已经存在
- 文件上传
- 获取访问路径
我们会发现无论是通过哪个平台进行文件的上传,基本上都会使用到上述的步骤,也就是说都会使用到上述的方法。 所以在这里我们定义一个抽象类来规定具体所需要使用的方法,然后各个具体实现来继承我们的抽象类即可。
@Getter
@Setter
public abstract class AbstractUploadStrategyImpl implements UploadStrategy {

    @Override
    public String uploadFile(MultipartFile file, String filePath) {
        try {

            //region 获取文件md5值 -> 获取文件后缀名 -> 生成相对路径
            String fileMd5 = FileUtil.getMd5(file.getInputStream());
            String extName = FileUtil.getExtName(file.getOriginalFilename());
            String fileRelativePath = filePath + fileMd5 + extName;
            //endregion

            //region 初始化
            initClient();
            //endregion

            //region 检测文件是否已经存在,不存在则进行上传操作
            if (!checkFileIsExisted(fileRelativePath)) {
                executeUpload(file, fileRelativePath);
            }
            //endregion

            return getPublicNetworkAccessUrl(fileRelativePath);
        } catch (IOException e) {
            throw new BaseException("文件上传失败");
        }
    }

    /**
     * 初始化客户端
     */
    public abstract void initClient();

    /**
     * 检查文件是否已经存在(文件MD5值唯一)
     *
     * @param fileRelativePath 文件相对路径
     * @return true 已经存在  false 不存在
     */
    public abstract boolean checkFileIsExisted(String fileRelativePath);

    /**
     * 执行上传操作
     *
     * @param file             文件
     * @param fileRelativePath 文件相对路径
     * @throws IOException io异常信息
     */
    public abstract void executeUpload(MultipartFile file, String fileRelativePath) throws IOException;

    /**
     * 获取公网访问路径
     *
     * @param fileRelativePath 文件相对路径
     * @return 公网访问绝对路径
     */
    public abstract String getPublicNetworkAccessUrl(String fileRelativePath);

}
🐥 2-3-1、Oss上传策略具体实现
我们在
OssUploadStrategyImpl实现文件上传至Oss平台,具体如何上传代码至阿里云Oss平台可以去看阿里云官方文档。
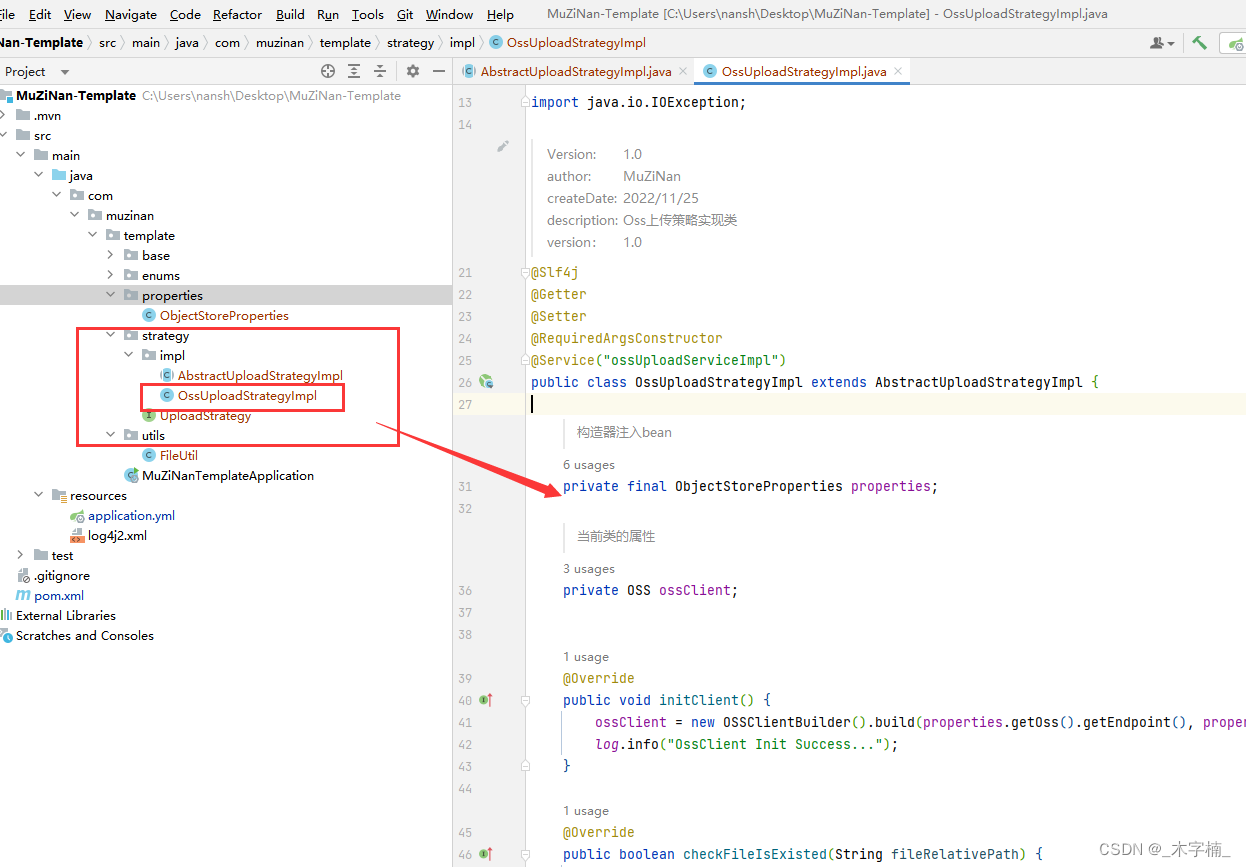
/**
 * @author: MuZiNan
 * @createDate: 2022/11/25
 * @description: Oss上传策略实现类
 * @version: 1.0
 */
@Slf4j
@Getter
@Setter
@RequiredArgsConstructor
@Service("ossUploadServiceImpl")
public class OssUploadStrategyImpl extends AbstractUploadStrategyImpl {

    /**
     * 构造器注入bean
     */
    private final ObjectStoreProperties properties;

    /**
     * 当前类的属性
     */
    private OSS ossClient;


    @Override
    public void initClient() {
        ossClient = new OSSClientBuilder().build(properties.getOss().getEndpoint(), properties.getOss().getAccessKey(), properties.getOss().getAccessKeySecret());
        log.info("OssClient Init Success...");
    }

    @Override
    public boolean checkFileIsExisted(String fileRelativePath) {
        return ossClient.doesObjectExist(properties.getOss().getBucket(), fileRelativePath);
    }

    @Override
    public void executeUpload(MultipartFile file, String fileRelativePath) throws IOException {
        log.info("File Upload Starts...");
        ossClient.putObject(properties.getOss().getBucket(), fileRelativePath, file.getInputStream());
        log.info("File Upload Finish...");
    }

    @Override
    public String getPublicNetworkAccessUrl(String fileRelativePath) {
        return properties.getOss().getDomainUrl() + fileRelativePath;
    }
}
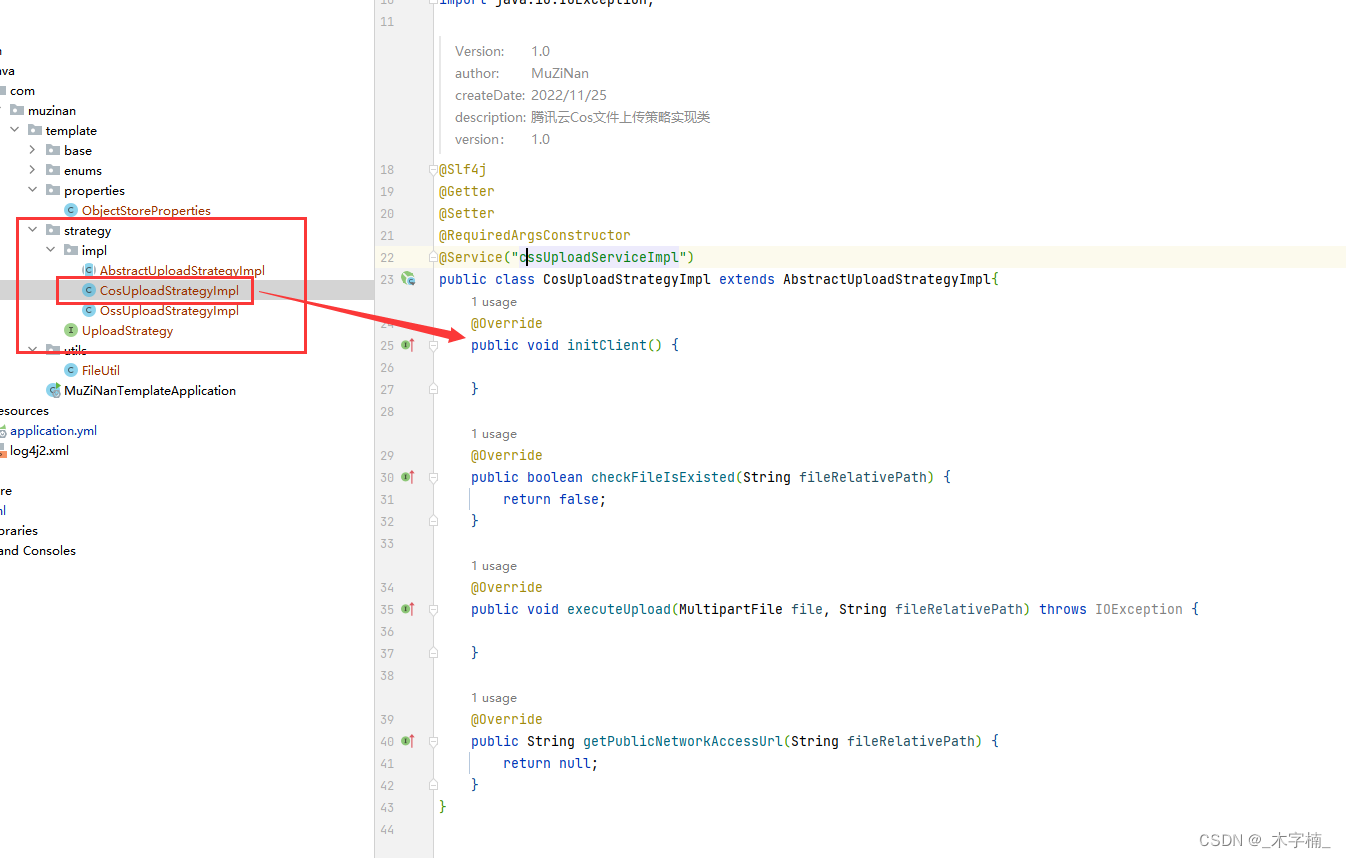
🐤 2-3-2、Cos上传策略具体实现
我们在
CosUploadStrategyImpl实现文件上传至Cos平台,具体如何上传代码至腾讯云Cos平台可以去看腾讯云官方文档。
/**
 * @author: MuZiNan
 * @createDate: 2022/11/25
 * @description: 腾讯云Cos文件上传策略实现类
 * @version: 1.0
 */
@Slf4j
@Getter
@Setter
@RequiredArgsConstructor
@Service("cssUploadServiceImpl")
public class CosUploadStrategyImpl extends AbstractUploadStrategyImpl {

    /**
     * 构造器注入
     */
    private final ObjectStoreProperties properties;

    /**
     * 属性
     */
    private COSClient cosClient;


    @Override
    public void initClient() {

        COSCredentials cred = new BasicCOSCredentials(properties.getCos().getAccessKey(), properties.getCos().getAccessKeySecret());
        //region ClientConfig 中包含了后续请求 COS 的客户端设置:
        ClientConfig clientConfig = new ClientConfig();
        clientConfig.setRegion(new Region(properties.getCos().getEndpoint()));
        clientConfig.setHttpProtocol(HttpProtocol.http);
        clientConfig.setSocketTimeout(30 * 1000);
        clientConfig.setConnectionTimeout(30 * 1000);
        //endregion

        // 生成 cos 客户端
        cosClient = new COSClient(cred, clientConfig);
        log.info("CosClient Init Success...");
    }

    @Override
    public boolean checkFileIsExisted(String fileRelativePath) {
        return cosClient.doesObjectExist(properties.getCos().getBucket(), fileRelativePath);
    }

    @Override
    public void executeUpload(MultipartFile file, String fileRelativePath) throws IOException {
        log.info("File Upload Starts...");
        cosClient.putObject(properties.getCos().getBucket(), fileRelativePath, file.getInputStream(), null);
        log.info("File Upload Finish...");
    }

    @Override
    public String getPublicNetworkAccessUrl(String fileRelativePath) {
        return properties.getCos().getDomainUrl() + fileRelativePath;
    }
}
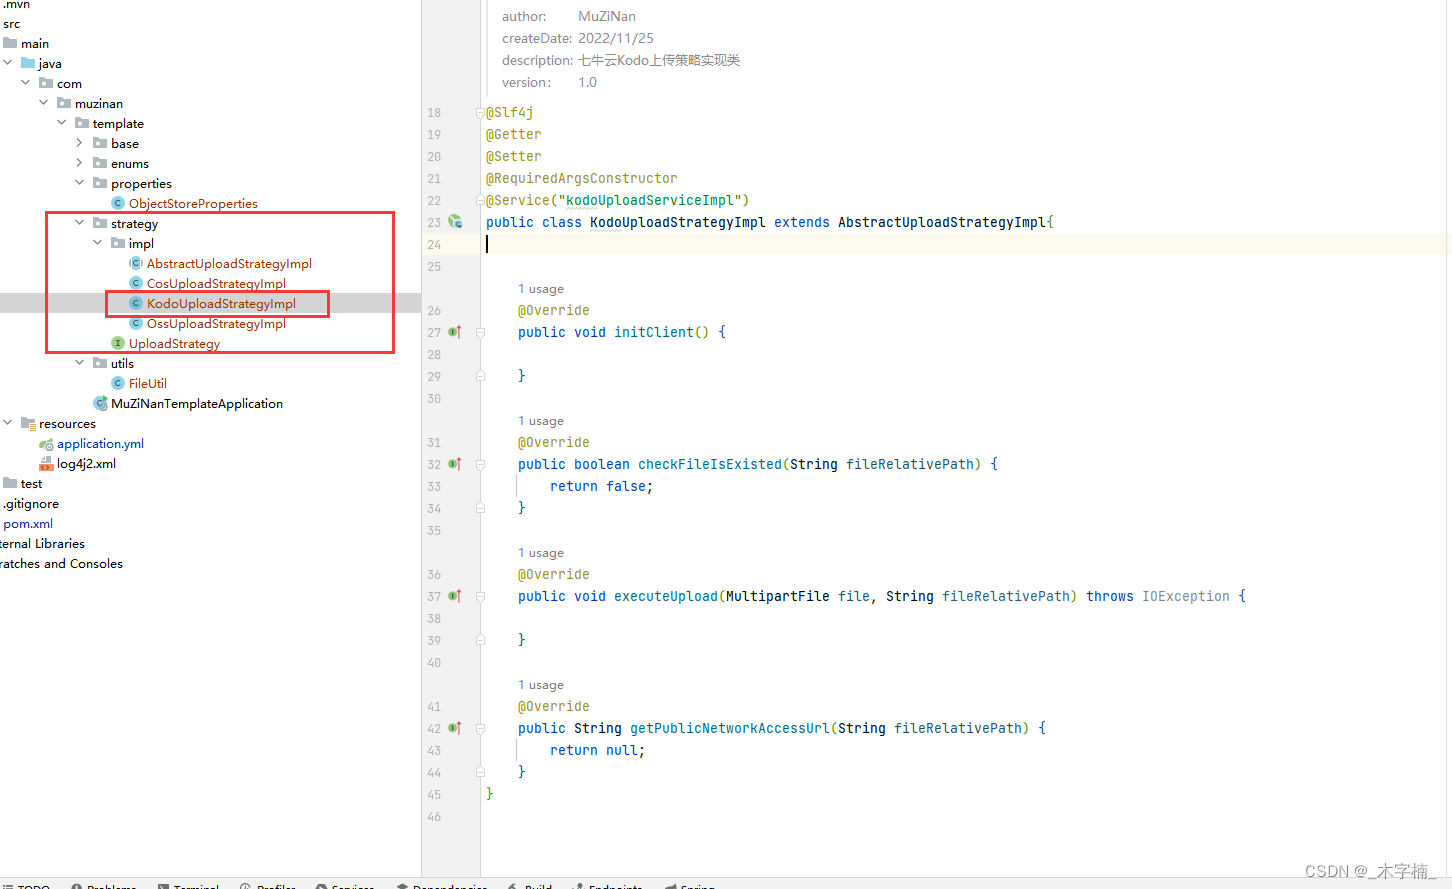
🐣 2-3-3、Kodo上传策略具体实现
我们在
KodoUploadStrategyImpl实现文件上传至七牛云平台,具体如何上传代码至七牛云Kodo平台可以去看七牛云官方文档。
/**
 * @author: MuZiNan
 * @createDate: 2022/11/25
 * @description: 七牛云Kodo上传策略实现类
 * @version: 1.0
 */
@Slf4j
@Getter
@Setter
@RequiredArgsConstructor
@Service("kodoUploadServiceImpl")
public class KodoUploadStrategyImpl extends AbstractUploadStrategyImpl {

    /**
     * 构造器注入Bean
     */
    private final ObjectStoreProperties properties;

    /**
     * upToken
     */
    private String upToken;

    /**
     * 上传Manger
     */
    private UploadManager uploadManager;

    /**
     * 存储桶Manger
     */
    private BucketManager bucketManager;


    @Override
    public void initClient() {
        Auth auth = Auth.create(properties.getKodo().getAccessKey(), properties.getKodo().getAccessKeySecret());
        upToken = auth.uploadToken(properties.getKodo().getBucket());
        Configuration cfg = new Configuration(Region.region0());
        cfg.resumableUploadAPIVersion = Configuration.ResumableUploadAPIVersion.V2;
        uploadManager = new UploadManager(cfg);
        bucketManager = new BucketManager(auth, cfg);
        log.info("OssClient Init Success...");
    }

    @Override
    public boolean checkFileIsExisted(String fileRelativePath) {
        try {
            if (null == bucketManager.stat(properties.getKodo().getBucket(), fileRelativePath)) {
                return false;
            }
        } catch (QiniuException e) {
            return false;
        }
        return true;
    }

    @Override
    public void executeUpload(MultipartFile file, String fileRelativePath) throws IOException {
        try {
            uploadManager.put(file.getInputStream(), fileRelativePath, upToken, null, null);
        } catch (IOException e) {
            log.error("文件上传失败");
            throw new BaseException("文件上传失败");
        }
    }

    @Override
    public String getPublicNetworkAccessUrl(String fileRelativePath) {
        return properties.getKodo().getDomainUrl() + fileRelativePath;
    }
}
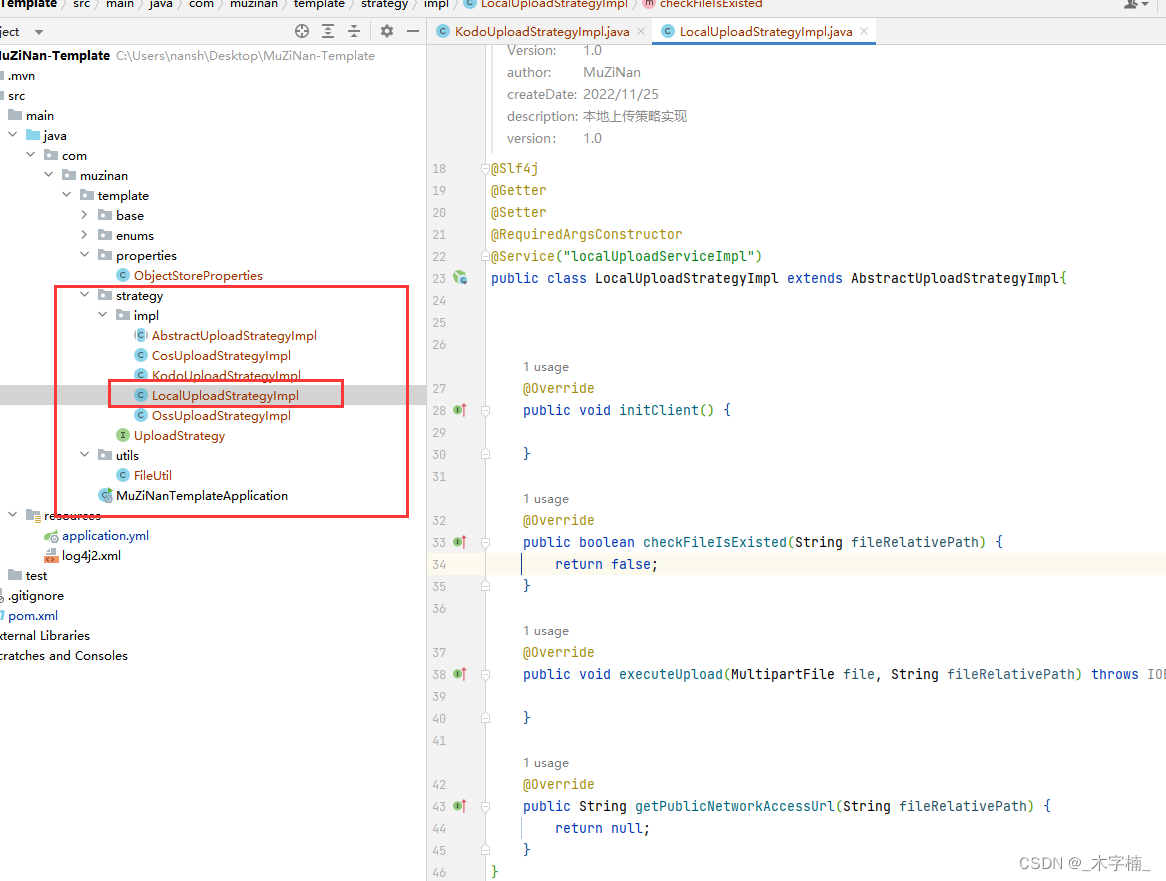
🦇 2-3-4、本地上传策略具体实现
我们在
LocalUploadStrategyImpl实现文件上传至本地
/**
 * @author: MuZiNan
 * @createDate: 2022/11/25
 * @description: 本地上传策略实现
 * @version: 1.0
 */
@Slf4j
@Getter
@Setter
@RequiredArgsConstructor
@Service("localUploadServiceImpl")
public class LocalUploadStrategyImpl extends AbstractUploadStrategyImpl {

    /**
     * 本地项目端口
     */
    @Value("${server.port}")
    private Integer port;

    /**
     * 前置路径 ip/域名
     */
    private String prefixUrl;

    /**
     * 构造器注入bean
     */
    private final ObjectStoreProperties properties;

    @Override
    public void initClient() {
        try {
            prefixUrl = ResourceUtils.getURL("classpath:").getPath() + "static/";
        } catch (FileNotFoundException e) {
            e.printStackTrace();
            throw new BaseException("文件不存在");
        }
        log.info("CosClient Init Success...");
    }

    @Override
    public boolean checkFileIsExisted(String fileRelativePath) {
        return new File(prefixUrl + fileRelativePath).exists();
    }

    @Override
    public void executeUpload(MultipartFile file, String fileRelativePath) throws IOException {
        File dest = checkFolderIsExisted(fileRelativePath);
        try {
            file.transferTo(dest);
        } catch (IOException e) {
            e.printStackTrace();
            throw new BaseException("文件上传失败");
        }
    }

    @Override
    public String getPublicNetworkAccessUrl(String fileRelativePath) {
        try {
            String host = InetAddress.getLocalHost().getHostAddress();
            if (StringUtils.isEmpty(properties.getLocal().getDomainUrl())) {
                return String.format("http://%s:%d%s", host, port, fileRelativePath);
            }
            return properties.getLocal().getDomainUrl() + fileRelativePath;
        } catch (UnknownHostException e) {
            throw new BaseException(HttpCodeEnum.UNKNOWN_ERROR);
        }
    }


    /**
     * 检查文件夹是否存在,若不存在则创建文件夹,最终返回上传文件
     *
     * @param fileRelativePath 文件相对路径
     * @return {@link  File} 文件
     */
    private File checkFolderIsExisted(String fileRelativePath) {
        File rootPath = new File(prefixUrl + fileRelativePath);
        if (!rootPath.exists()) {
            if (!rootPath.mkdirs()) {
                throw new BaseException("文件夹创建失败");
            }
        }
        return rootPath;
    }

}
🦋 2.4、策略上下文实现
我们通过策略上下文来选择使用哪种上传方式。 注意点:
-
当Map集合的Value为接口类型时,Spring会自动对Map集合进行注入。
- 其中map集合的key为接口对应实现类的BeanName
- 其中map集合的vlaue为接口对应实现类的实例
其中传入的uploadServiceName就是对应策略类所规定的的BeanName,这里的BeanName就作为选择的条件。
/**
 * @author: MuZiNan
 * @createDate: 2022/11/25
 * @description: 上传策略上下文
 * @version: 1.0
 */
@Component
@RequiredArgsConstructor
public class UploadStrategyContext {

    private final Map<String, UploadStrategy> uploadStrategyMap;

    /**
     * 执行上传策略
     *
     * @param file     文件
     * @param filePath 文件上传路径前缀
     * @return {@link String} 文件上传全路径
     */
    public String executeUploadStrategy(MultipartFile file, final String filePath, String uploadServiceName) {
        // 执行特点的上传策略
        return uploadStrategyMap.get(uploadServiceName).uploadFile(file, filePath);
    }

}
🐌 2.5、不同策略上传测试
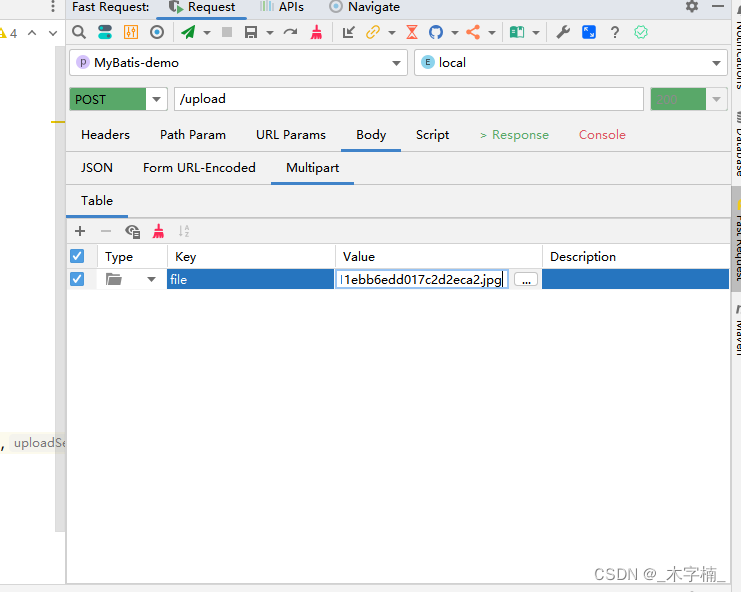
本文章中的项目测试使用的IDEA 插件
Fast Request,确实很好用,但是插件是需要付费的插件,大家可以先免费试用30天。
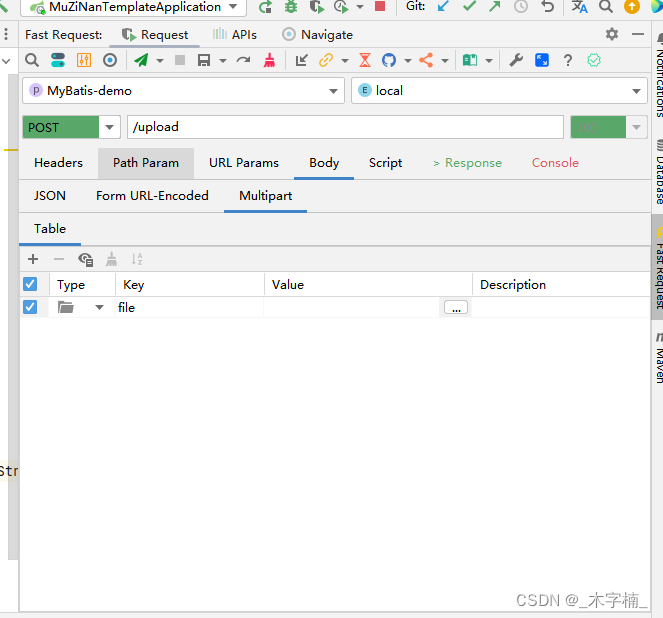
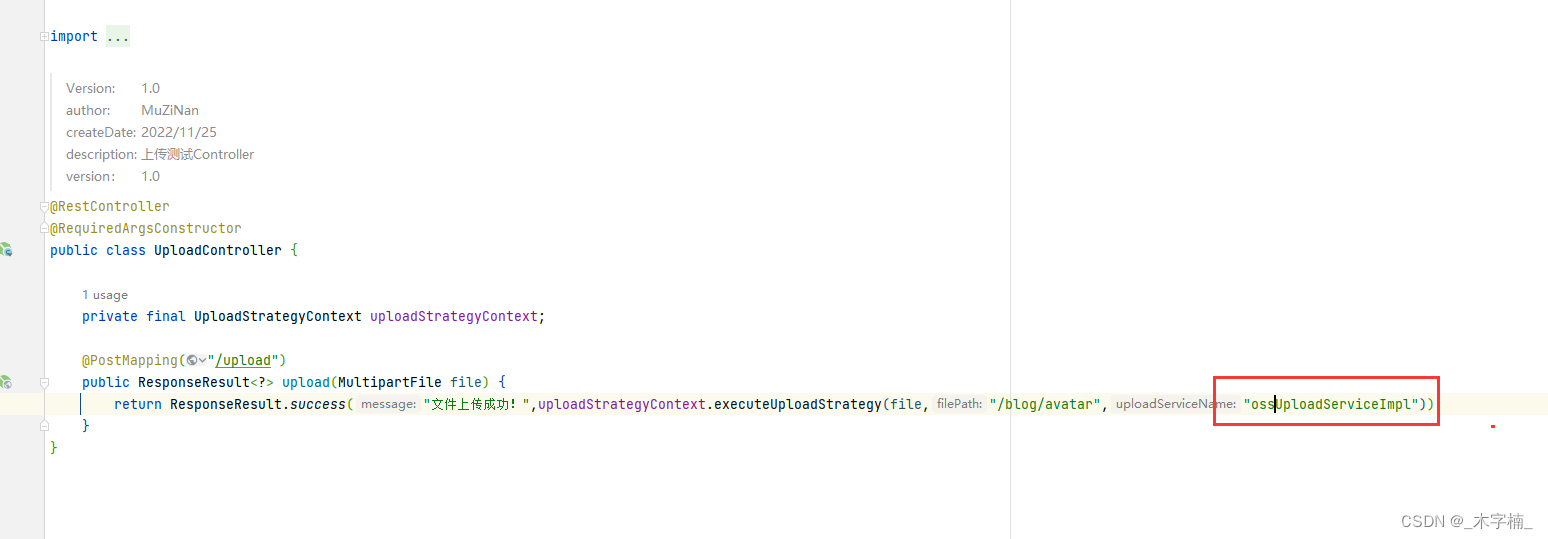
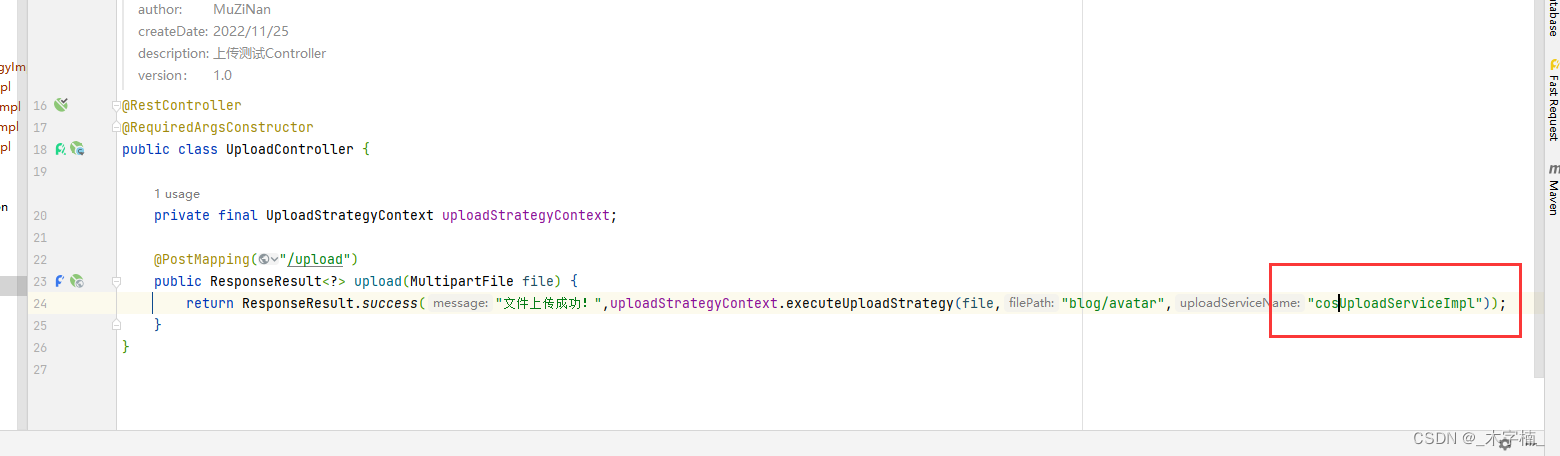
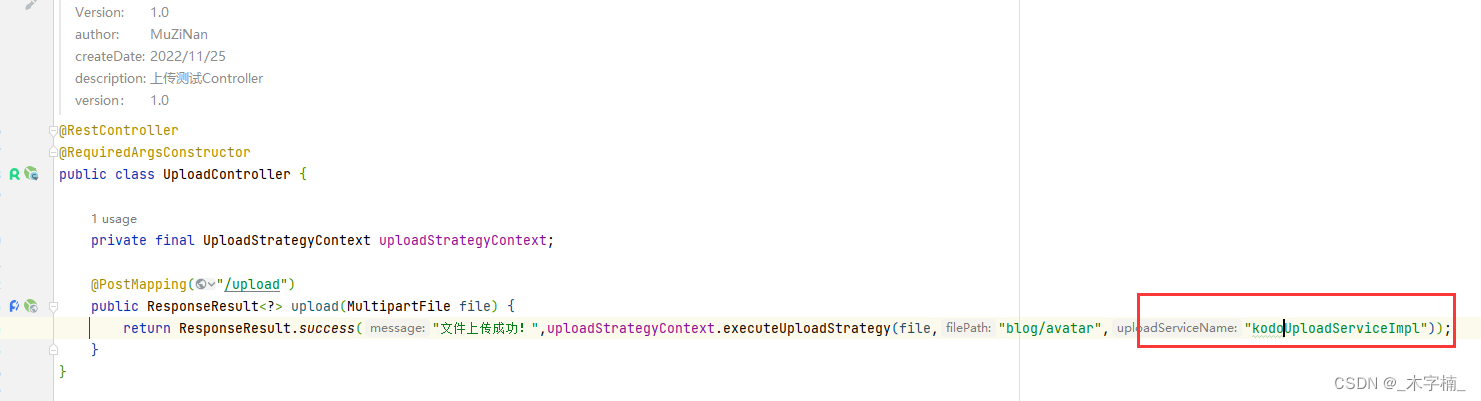
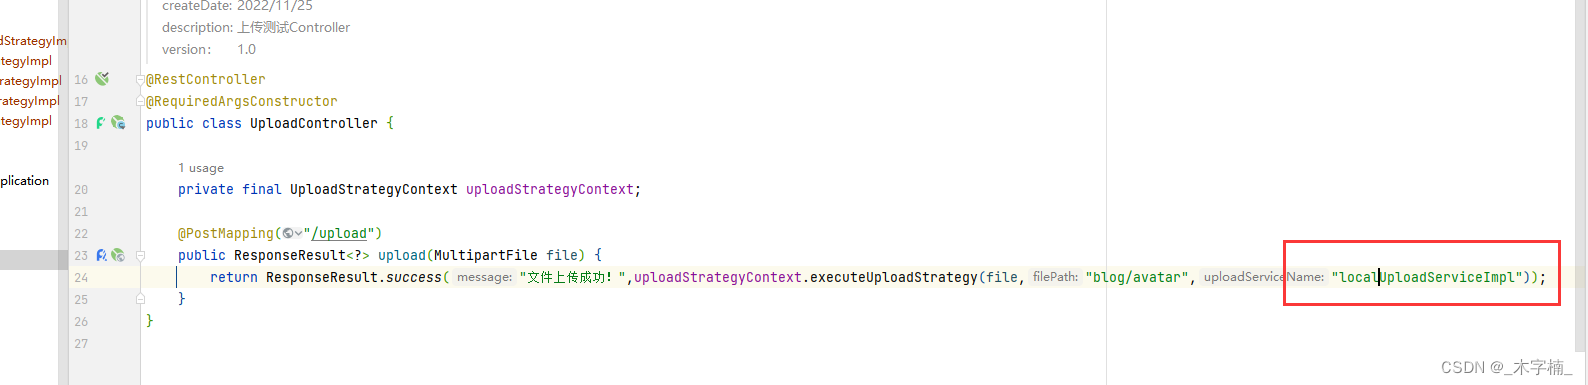
🦞 2.5.1、上传测试controller代码
@RestController
@RequiredArgsConstructor
public class UploadController {

    private final UploadStrategyContext uploadStrategyContext;

    @PostMapping("/upload")
    public ResponseResult<?> upload(MultipartFile file) {
        return ResponseResult.success("文件上传成功!",uploadStrategyContext.executeUploadStrategy(file,"/blog/avatar","cosUploadServiceImpl"));
    }
}
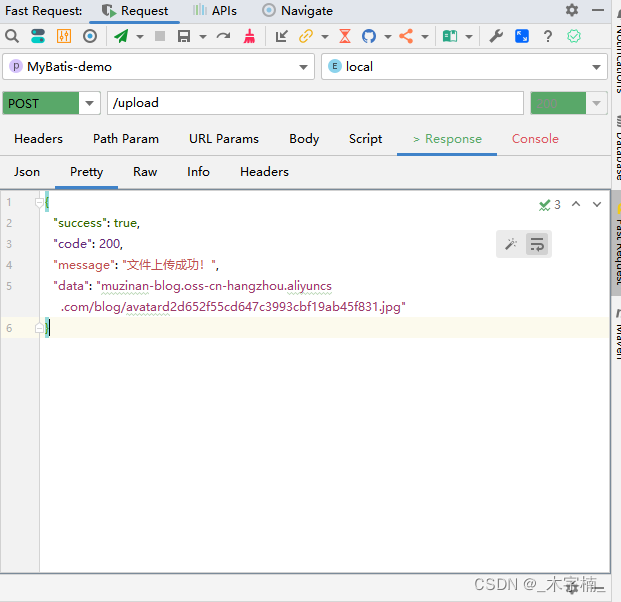
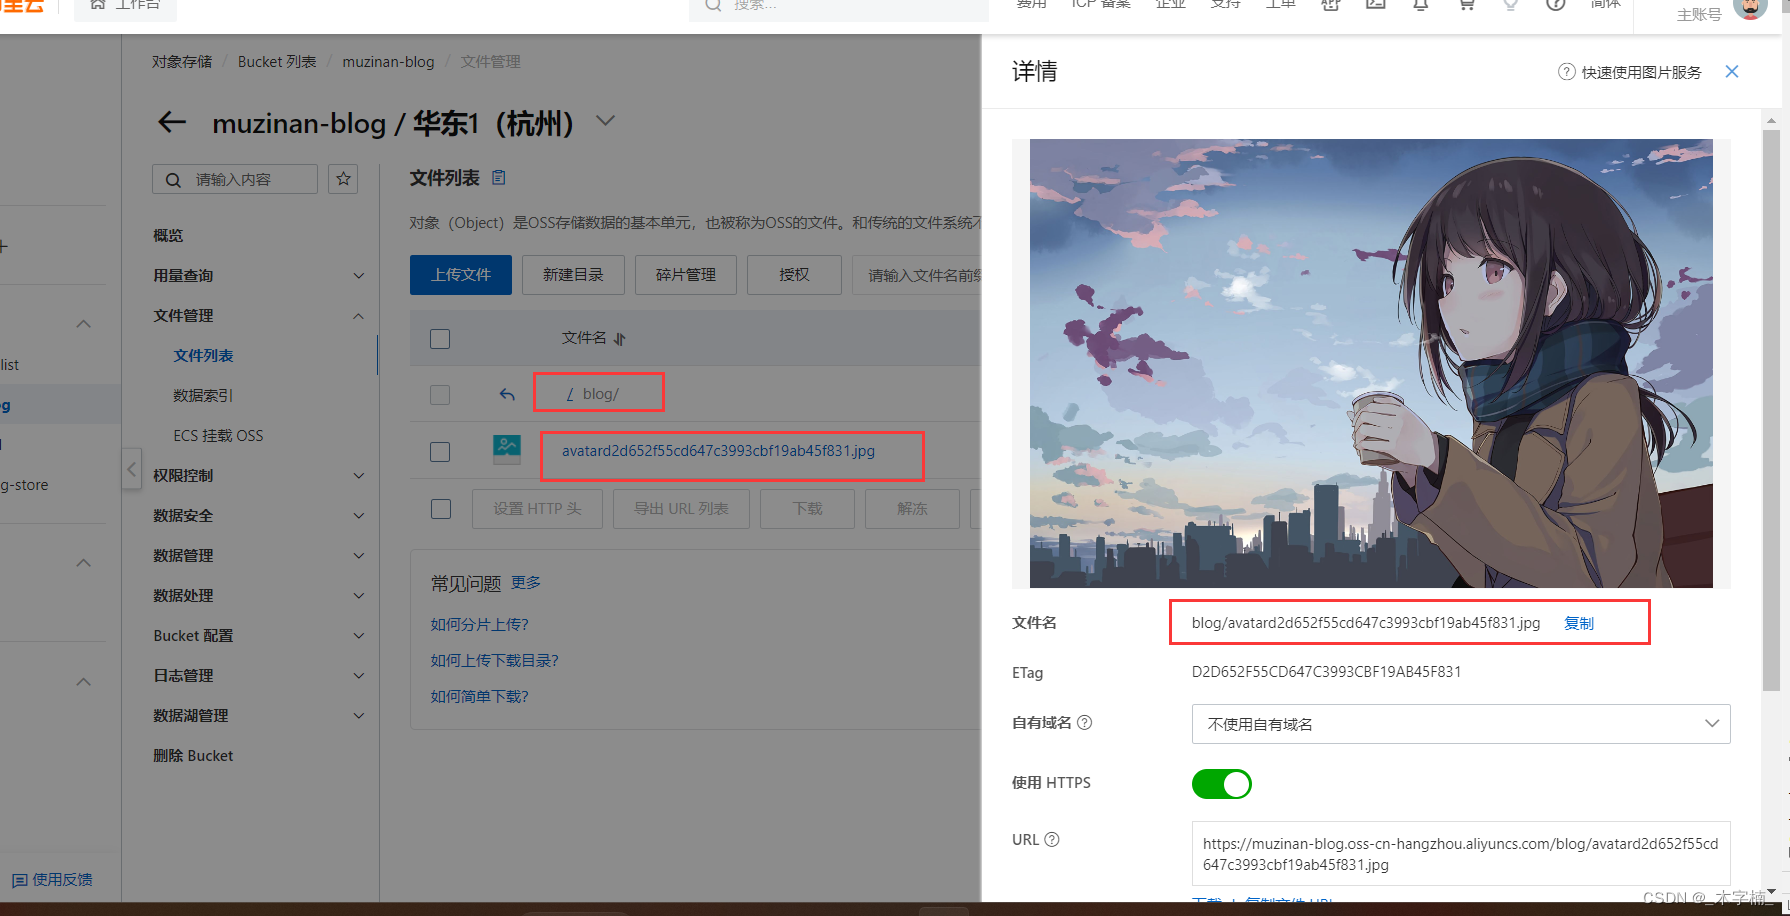
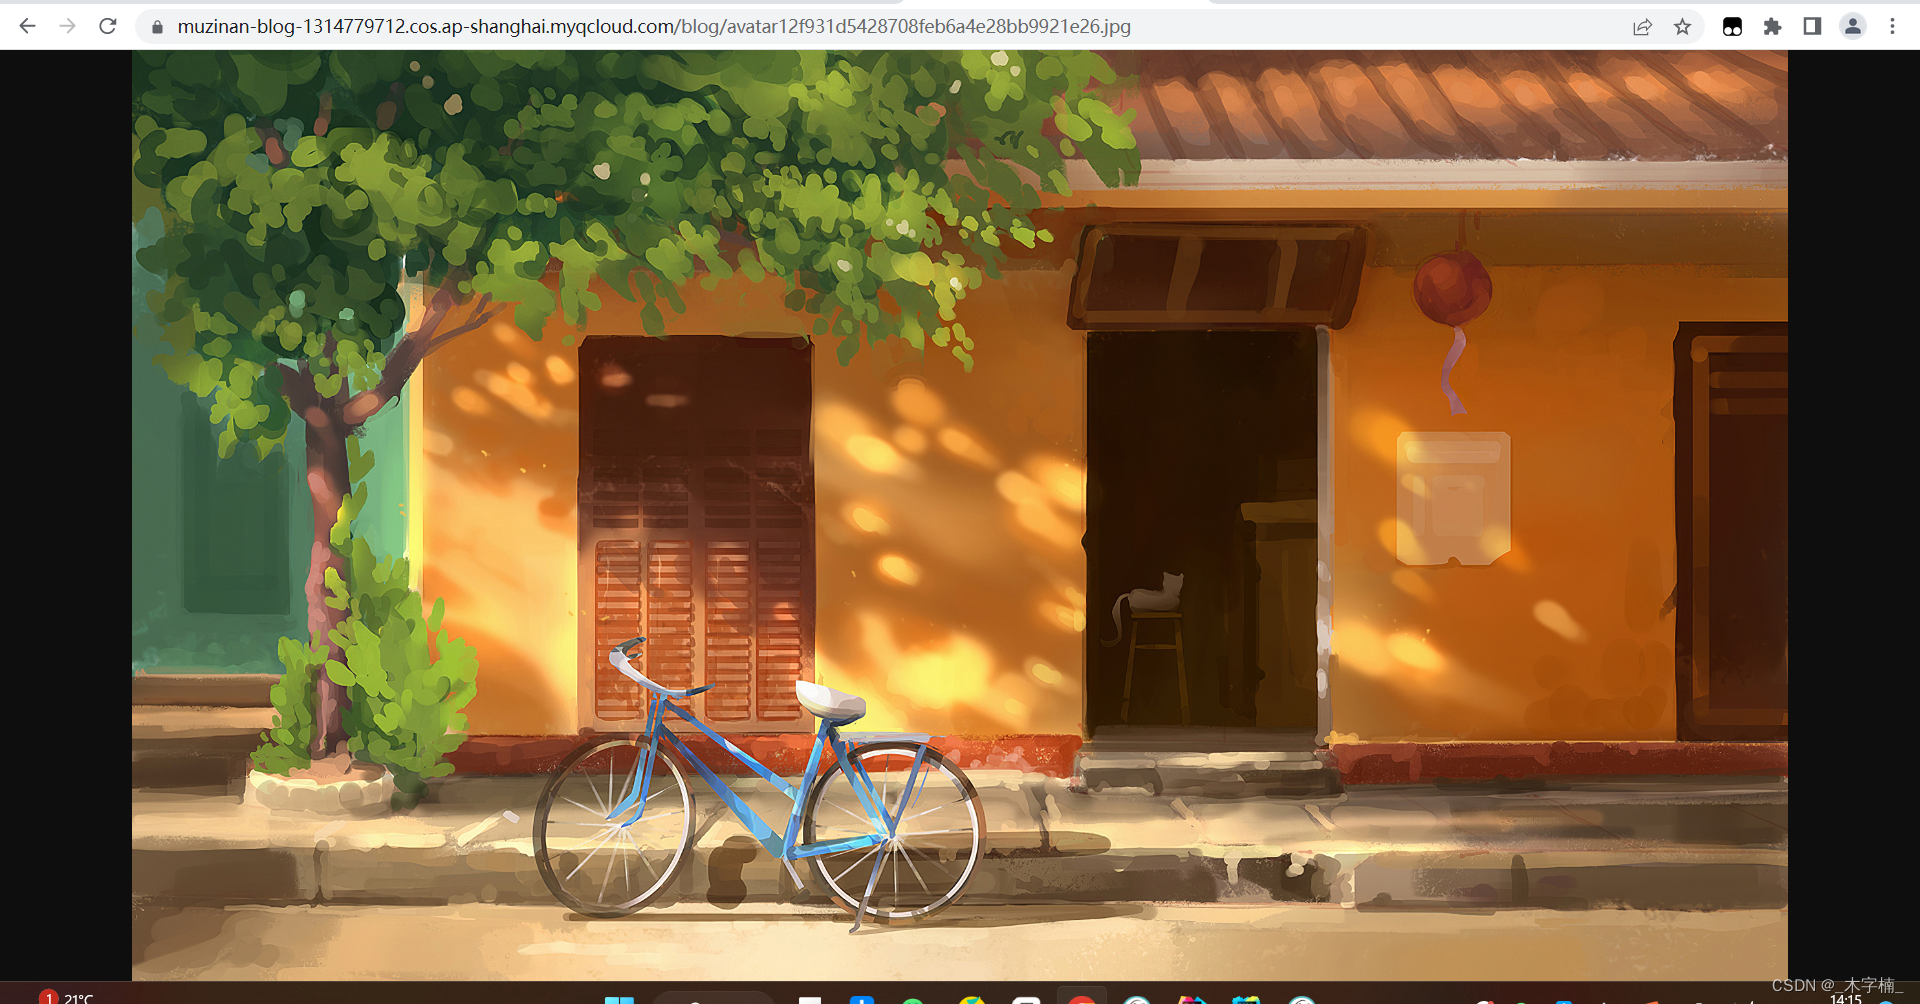
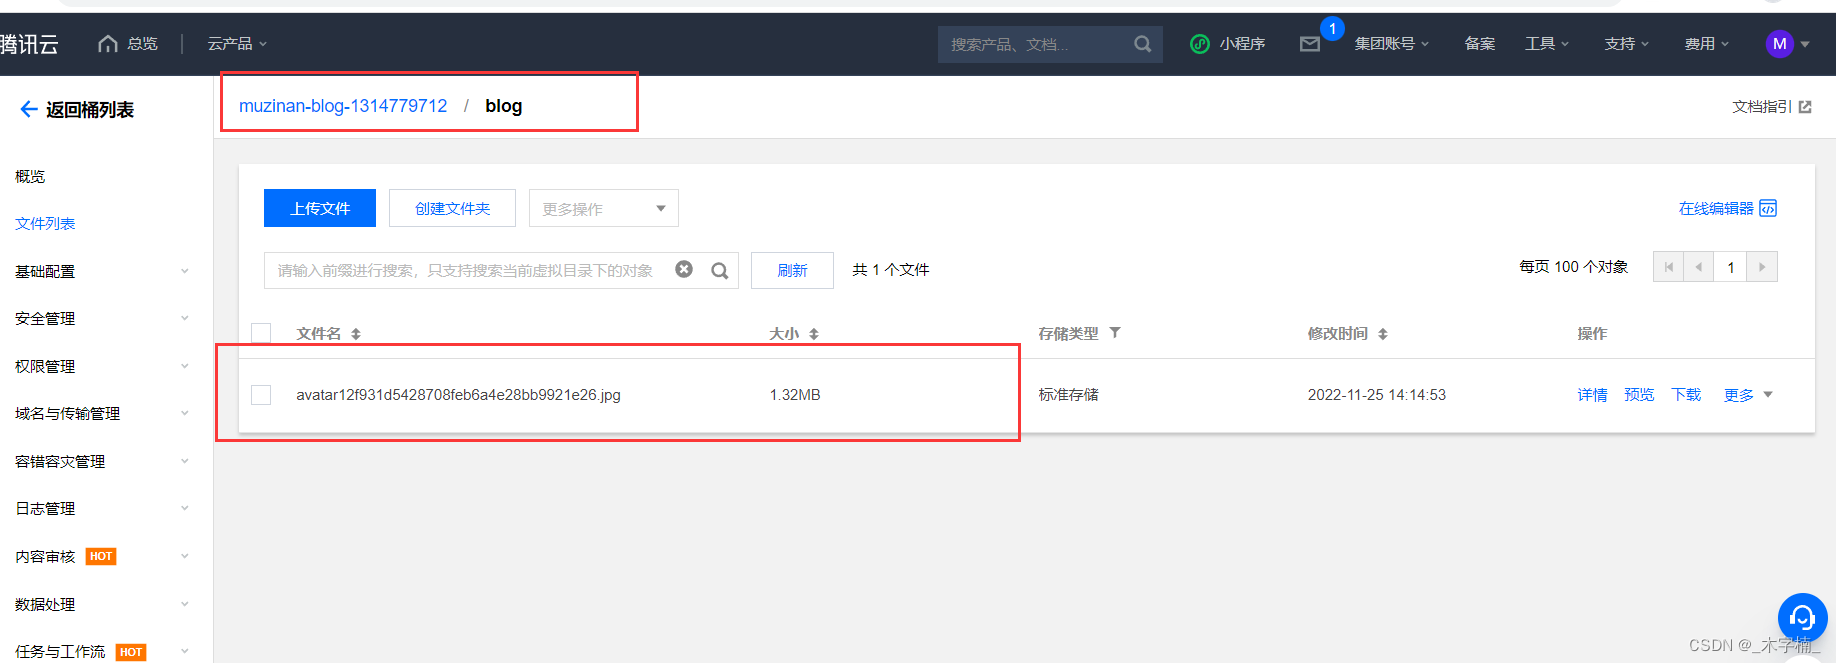
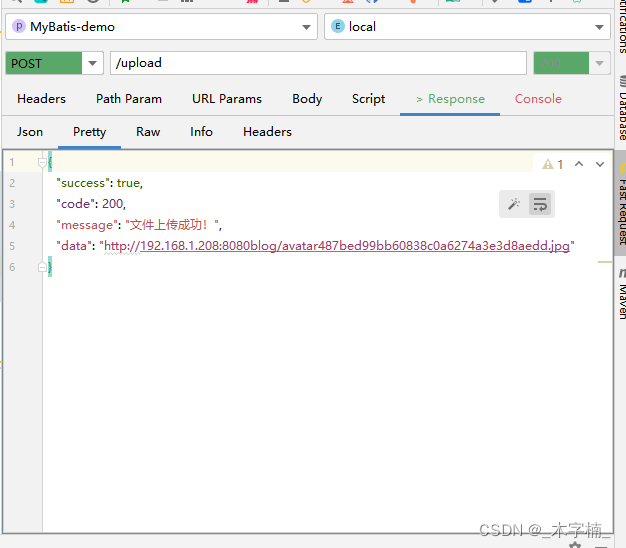
🦀 2.5.2、Oss上传测试
目前我们的库中是没有任何文件的,接下来我们进行上传测试。 我们需要第三个参数更换为具体所需要执行的策略实现类的BeanName
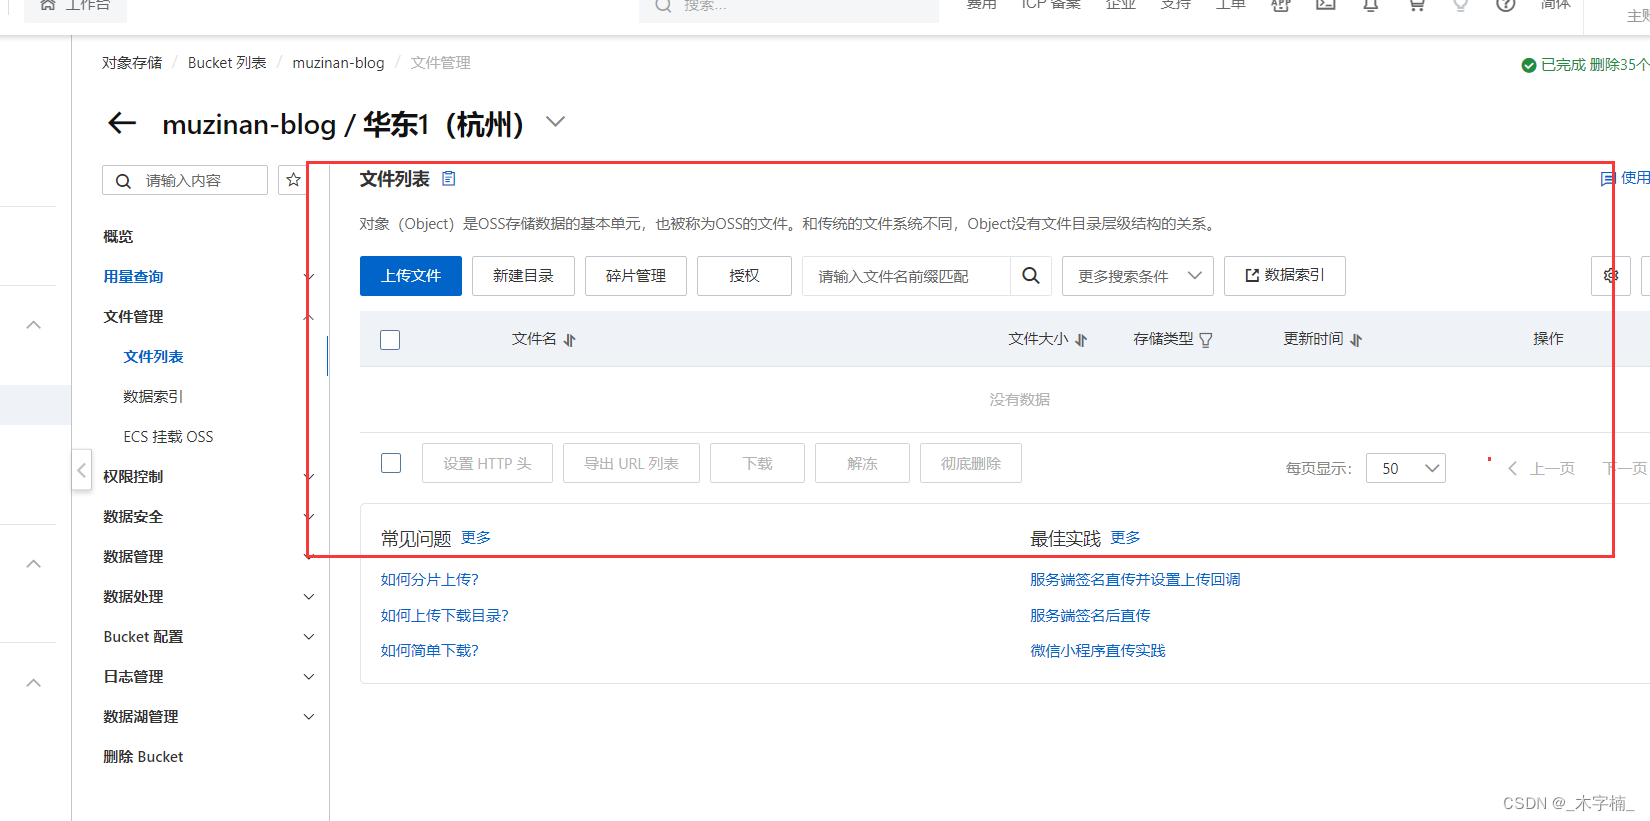
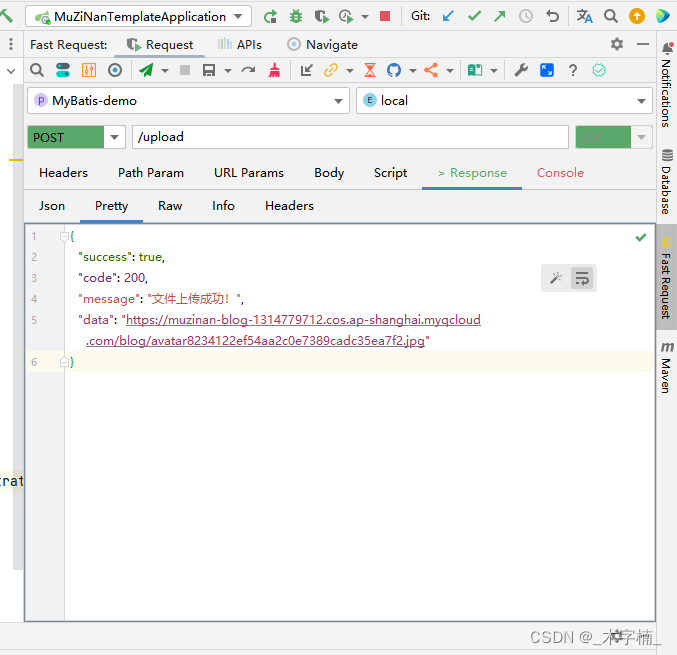
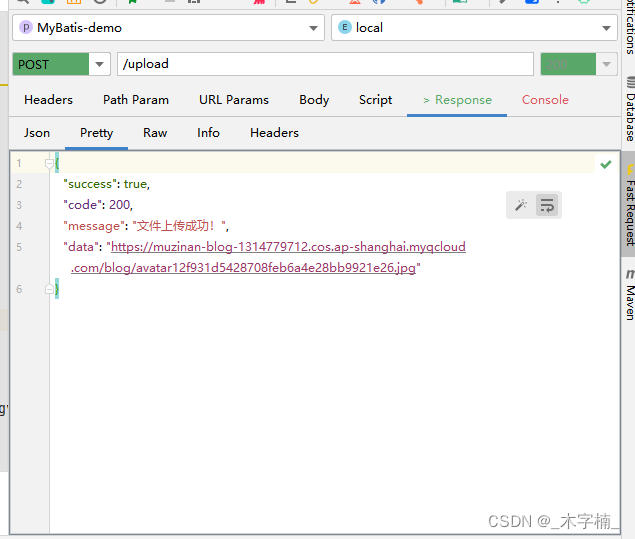
🪳 2.5.3、Cos上传测试
目前我们的库中是没有任何文件的,接下来我们进行上传测试。 我们需要第三个参数更换为具体所需要执行的策略实现类的BeanName

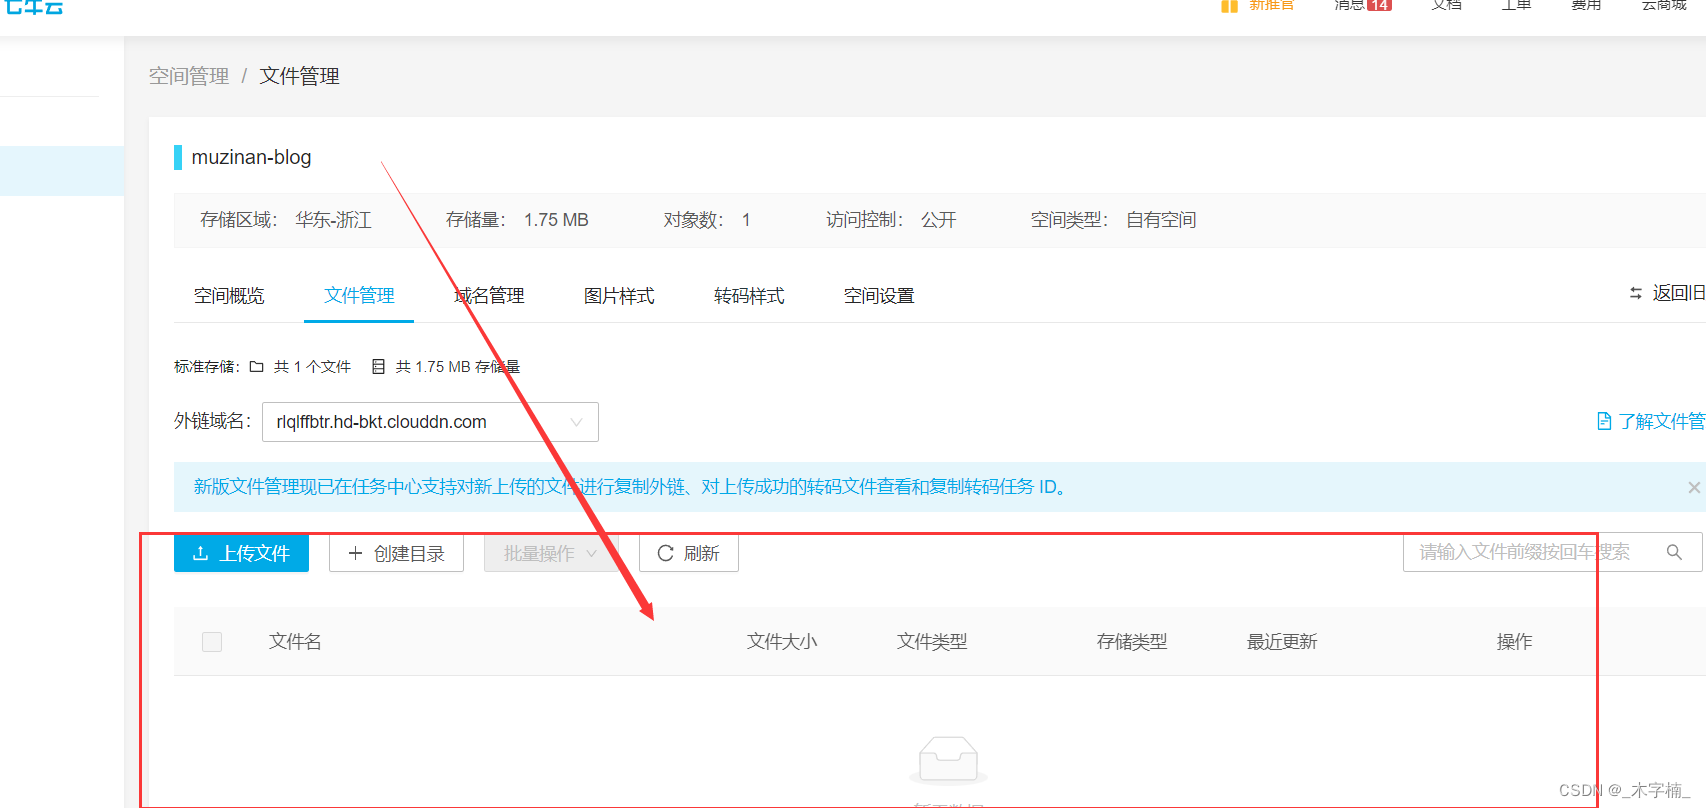
🐝 2.5.4、Kodo上传测试
目前我们的库中是没有任何文件的,接下来我们进行上传测试。 我们需要第三个参数更换为具体所需要执行的策略实现类的BeanName


🪲 2.5.5、本地上传测试
目前我们的库中是没有任何文件的,接下来我们进行上传测试。 我们需要第三个参数更换为具体所需要执行的策略实现类的BeanName

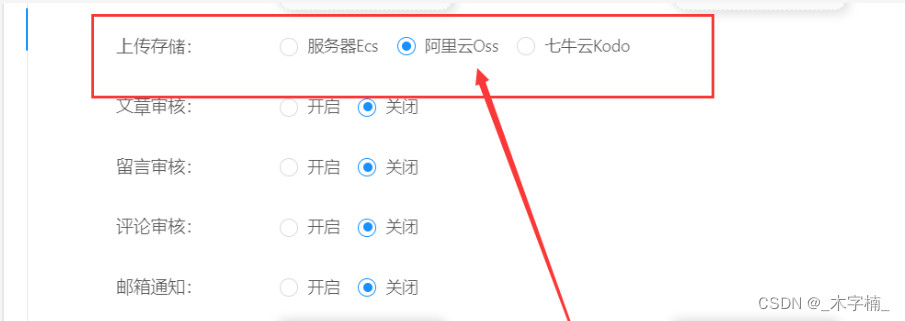
上述只是对于策略模式的简单实践。 我们可以通过网站全局配制结合前端界面来完成选择使用哪个平台来进行文件的上传。 当我们选中哪种上传模式,那么后台则会执行该上传方式
上述案例代码已经存在在GitCode平台当中
https://gitcode.net/nanshen__/store-object
忘掉拥有过的花,去种有结果的树。