点击上方蓝字关注我们
前面给大家介绍了一些在线构建聊天机器人和私有化离线部署LLM模型建立知识库的方案,如Quivr结合Supabase、PrivateGPT、ChatGLM 6B
等,
基本上这些解决方案的背后整体的核心都离不开一个关键技术,就是LangChain。其次这些技术或多或少需要一定的技术开发基础,对于普通大众也希望快速借助ChatGPT构建自己的APP应用,有没有比较好的解决方案呢? 答案显然是有的。
今天就给大家介绍一款无代码平台Flowise,它基于
LangChain.js
提供了丰富的内置组件,方便我们通过拖拉拽的方式,以非常直观可视化的方式快速构建属于我们自己的聊天机器人、智能客户、知识问答等应用。同时,也可以非常方便的集成到自己的产品中去。

一、Flowise介绍
Flowise 是一个开源项目,将永远免费供商业和个人使用。
Flowise 基于🦜️🔗 LangChain.js ,是一个非常先进的图形用户界面,用于开发基于 LLM 的应用程序。这些应用程序也称为 Gen Apps、LLM Apps、Prompt Chaining、LLM Chains 等。
Flowise 是专门为 LangChain 打造的用户界面 (UI),利用了 React-Flow 技术。其目的是提供一个无缝平台,用于轻松进行流程实验和原型设计。用户可以享受拖放组件和聊天框功能的便利,以增强他们的体验。
二、Flowise安装
项目地址:https://github.com/FlowiseAI/Flowise
2.1、NPM部署

下载并安装NodeJS >= 18.15.0
1、安装 Flowise
npm install -g flowise
2、启动流程
npx flowise start
有用户名和密码(推荐)
npx flowise start --FLOWISE_USERNAME=user --FLOWISE_PASSWORD=1234
3、打开http://localhost:3000
2.2、Docker部署
Docker Compose
1、转到docker项目根目录下的文件夹
2、创建.env文件并指定PORT(参考.env.example)
3、启动容器docker-compose up -d
4、打开http://localhost:3000
5、您可以通过以下方式将容器放下docker-compose stop
Docker Image
1、在本地构建镜像:
docker build --no-cache -t flowise .
2、运行镜像:
docker run -d --name flowise -p 3000:3000 flowise
3、停止镜像:
docker stop flowise
2.3、开发环境
Flowise在单一的代码仓库中有三个不同的模块。
- server: Node后端用于提供API逻辑
- ui: React前端
- components: LangChain组件
2.3.1、先决条件
安装Yarn
npm i -g yarn
2.3.2、安装步骤
1、克隆仓库
git clone https://github.com/FlowiseAI/Flowise.git
2、进入仓库文件夹
cd Flowise
3、安装所有模块的依赖:
yarn install
4、构建所有代码:
yarn build
5、启动应用程序:
yarn start
现在可以通过 http://localhost:3000 访问应用程序了。
6、若要进行开发构建:
yarn dev
任何代码更改都会自动重新加载应用程序,使用地址为 http://localhost:8080。
三、授权
Flowise有两种授权方式:
3.1、应用级别
应用级别的授权通过用户名和密码来保护您的Flowise实例。这可以防止您的应用在部署在线时被任何人访问。

3.2、聊天流程级别
假设您已经构建了一个聊天流程,并且只希望特定的人能够访问和交互。您可以通过为该特定聊天流程分配API密钥来实现。
3.3、API密钥
在仪表板中,导航到API密钥部分,您应该能够看到创建了一个DefaultKey。您也可以添加或删除任何密钥。

3.4、聊天流程
导航至 Chatflow,现在您可以选择要使用的 API 密钥来保护 Chatflow。

分配 API 密钥后,在进行 HTTP 调用时,只有提供了正确的 API 密钥所指定的 Authorization 头部,才可以访问 Chatflow API。
"Authorization": "Bearer "
以下是使用 POSTMAN 调用 API 的示例:

3.5、设置用户名和密码
3.5.1、NPM
1、安装Flowise
npm install -g flowise
2、用用户名和密码启动Flowise
npx flowise start --FLOWISE_USERNAME=user --FLOWISE_PASSWORD=1234
3、打开http://localhost:3000
3.5.2、Docker
1、进入docker文件夹
cd docker
2、创建.env文件并指定端口,FLOWISEUSERNAME和FLOWISEPASSWORD
PORT=3000
FLOWISE_USERNAME=user
FLOWISE_PASSWORD=1234
3、将FLOWISEUSERNAME和FLOWISEPASSWORD传递给docker-compose.yml文件:
environment:
- PORT=PORT−FLOWISE_USERNAME={FLOWISE_USERNAME}
- FLOWISE_PASSWORD=${FLOWISE_PASSWORD}
4、docker-compose up -d
5、打开 http://localhost:3000
6、您可以通过docker-compose stop将容器关闭
3.5.3、Git克隆(本地)
要启用应用程序级身份验证,请将FLOWISEUSERNAME和FLOWISEPASSWORD添加到packages / server中的.env文件中:
FLOWISE_USERNAME=user
FLOWISE_PASSWORD=1234
四、应用集成
现在你已经在Flowise的聊天界面上测试了你的聊天流程,你想要“导出”它以便在其他应用程序中使用。Flowise提供了两种方法来实现这一点:
4.1、API
你可以将聊天流程作为API使用,并连接到前端应用程序。
4.2、Embed
您也可以在您的网站上嵌入一个聊天小工具。
只需将所提供的嵌入代码复制粘贴到您html文件的标签的任何地方。


五、向量数据库
5.1、Pinecone
5.1.1、先决条件
1、注册一个帐户
2、单击“创建第一个索引”

3、输入必填字段
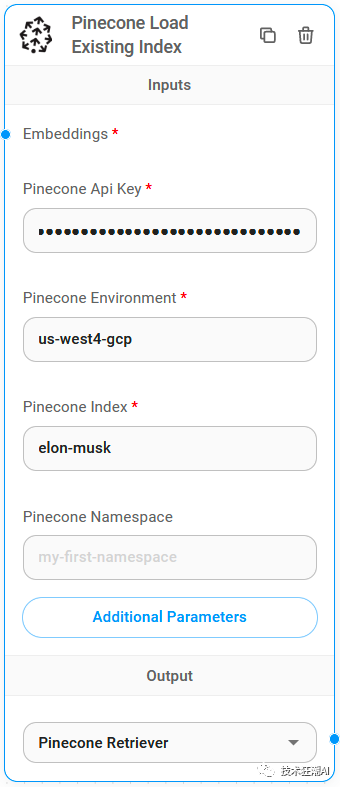
索引名称 ,要创建的索引的名称。(例如:elon-musk)
维度 ,要插入索引中的向量的大小。(例如:1536)

4、单击“创建索引”
5.1.2、设置
1、获取/创建您的API密钥
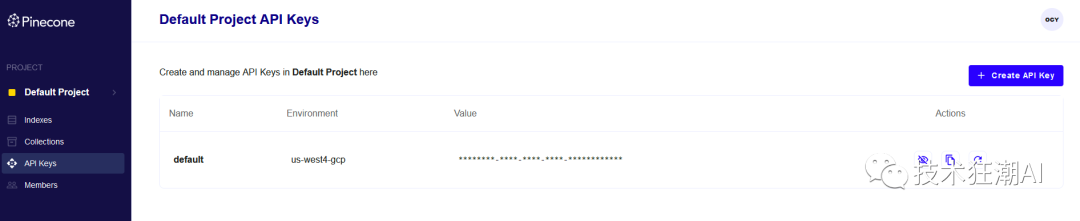
2、将每个详细信息(API密钥、环境、索引名称)复制并粘贴到Pinecone Upsert Document节点或Pinecone Load Existing Index节点中

3、文档可以与类别下的任何节点连接 嵌入可以与类别下的任何节点连接
4、嵌入可以与类别下的任何节点连接
5.2、Supabase
5.2.1、先决条件
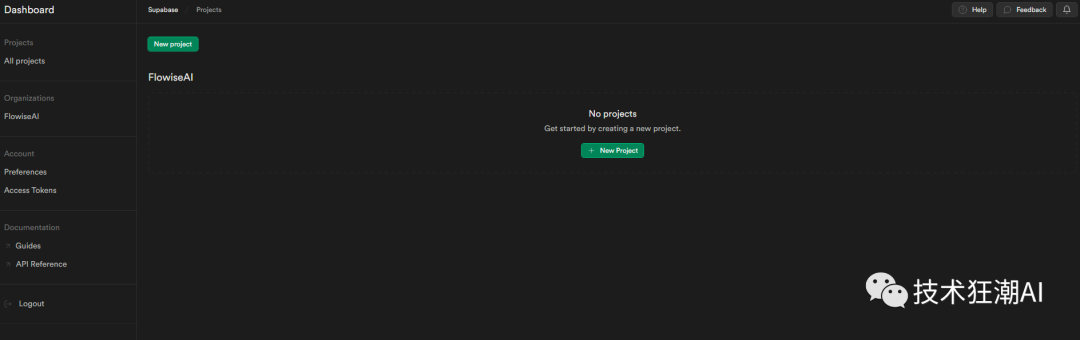
1、为Supabase注册一个帐户
2、点击“新建项目”
3、输入必填字段
名称 ,要创建的项目名称(例如Flowise)。
数据库密码 ,用于您的postgres数据库的密码。(例如,单击“生成密码”)
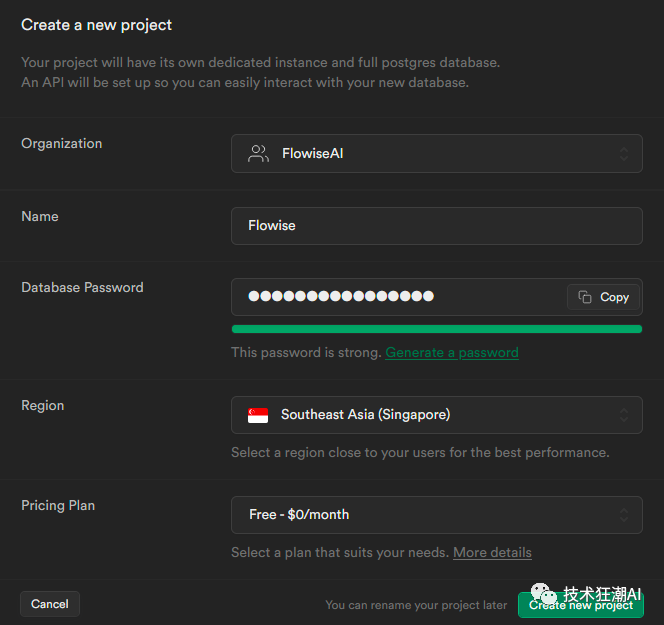
4、点击“创建新项目”,等待项目完成设置
5、单击SQL编辑器

6、单击“新查询”

7、复制并粘贴查询,通过Ctrl + Enter运行它或单击RUN
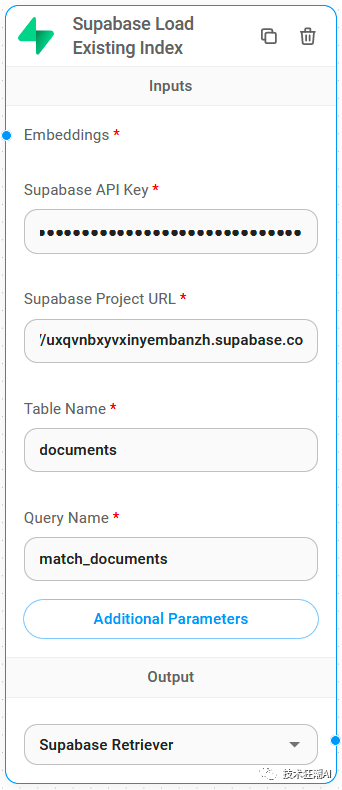
表名:documents
查询名称:match_documents
-- Enable the pgvector extension to work with embedding vectors
create extension vector;
-- Create a table to store your documents
create table documents (
id bigserial primary key,
content text, -- corresponds to Document.pageContent
metadata jsonb, -- corresponds to Document.metadata
embedding vector(1536) -- 1536 works for OpenAI embeddings, change if needed
);
-- Create a function to search for documents
create function match_documents (
query_embedding vector(1536),
match_count int DEFAULT null,
filter jsonb DEFAULT '{}'
) returns table (
id bigint,
content text,
metadata jsonb,
similarity float
)
language plpgsql
as $$
#variable_conflict use_column
begin
return query
select
id,
content,
metadata,
1 - (documents.embedding <=> query_embedding) as similarity
from documents
where metadata @> filter
order by documents.embedding <=> query_embedding
limit match_count;
end;

**5.2.2、设置**
=============
1、点击项目设置

2、获取您的项目网址和API密钥

3、将每个细节(API密钥、网址、表名、查询名称)复制并粘贴到Supabase Upsert文档节点或Supabase加载现有节点中

4、文档可以连接到文档加载器类别下的任何节点
5、嵌入可以连接到嵌入类别下的任何节点
5.3、Chroma

**5.3.1、先决条件**
===============
1、下载并安装Docker和Git
2、使用终端克隆Chroma的存储库
git clone https://github.com/chroma-core/chroma.git
3、更改目录路径到您克隆的Chroma
cd chroma

4、运行docker compose来构建Chroma镜像和容器
docker-compose up -d --build

**5.3.2、设置**
=============
1、将收集名称输入到Chroma Upsert Document节点或Chroma Load Existing Index节点中(例如elon-musk)。

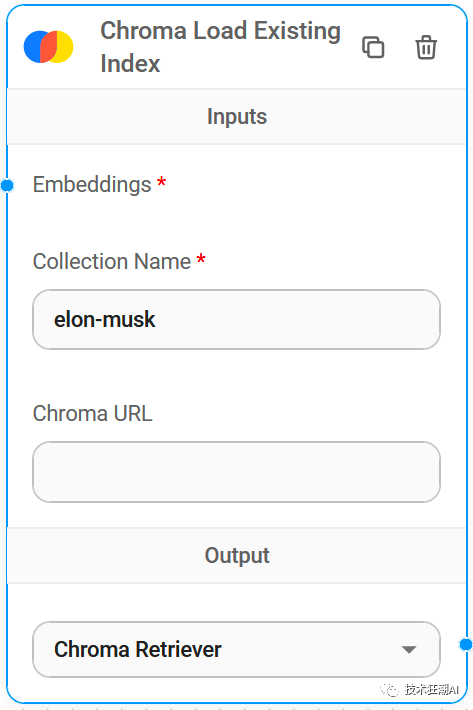
2、文档可以与“文档加载器”类别下的任何节点连接。
3、嵌入可以与“嵌入”类别下的任何节点连接。

六、构建LLM Apps
LLM应用程序构建生态系统中出现了许多构建块,包括提示工程、代理、链式、语义搜索、聊天模型、向量存储和各种可以分配给代理以执行操作的工具。
这些新方法使得构建灵活的对话界面变得更加容易。使用基于LLM的聊天流,对话设计和构建过程不再需要过度细致,不必处理太多的例外情况、闲聊(小聊天)或修复路径等细节问题,因为这些问题可以转移到LLM的弹性上。
需要注意的是,尽管Flowise免费使用,但也需要考虑托管成本和所有第三方API调用所产生成本。这些成本可能会随着用户数量增加而迅速上升,并且取决于这些系统被利用的程度。
另一个需要考虑的因素是延迟,以及需要访问地理上分散的系统等等。
Flowise确实是一个非常直观的LLM应用程序开发框架。尽管我在使用Flowise进行原型制作的早期阶段,但我确实感受到Flowise比LangFlow更加全面完整的开发UI。
6.1、聊天面板

下面您可以看到仪表板,其中包括API密钥、市场和聊天流程。请注意,列出了构成聊天流程的开发组件。

6.2、应用市场

Flowise还提供了一个应用市场,其中包含相当数量的预配置应用程序,可以帮助用户快速构建可工作的原型。这些预配置应用程序可以缩短开发时间,使用户能够更快地获得所需的结果。

6.3、天气机器人

下面的应用程序是一个基本的天气机器人,可能是可以编写的最简单的LLM链,只有三个组件:OpenAI连接器、提示模板和将两者连接起来的LLM链。

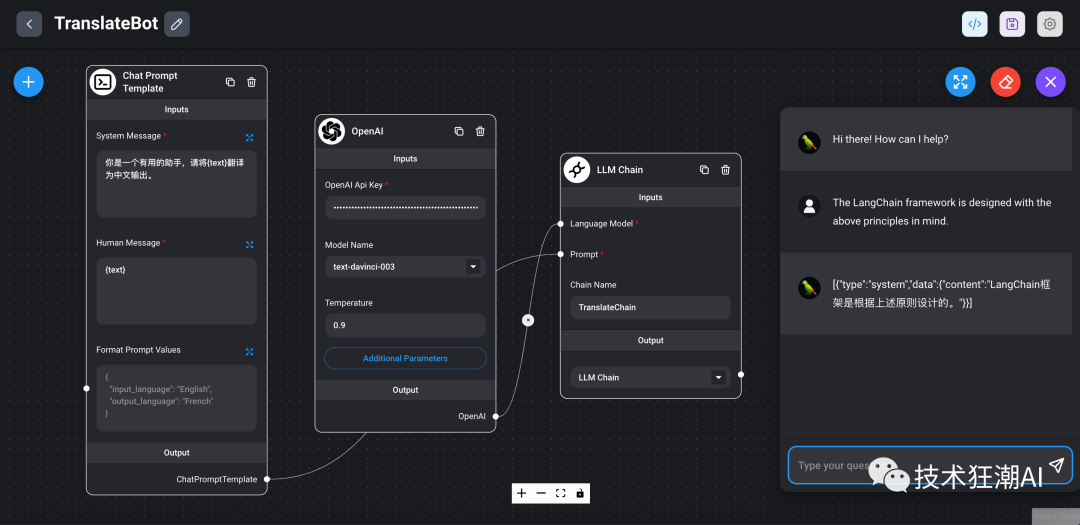
6.4、翻译机器人

下面的应用程序展示了一个基本的翻译机器人,它还说明了提示词如何被格式化。
6.5、综合机器人

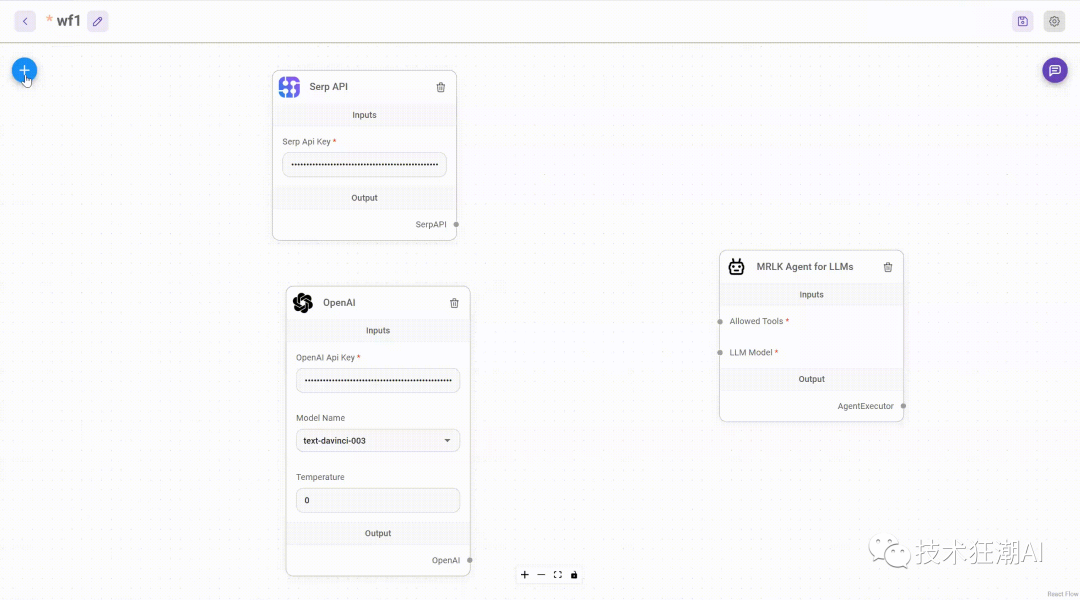
下面是一个综合知识对话机器人,它利用了OpenAI、Serp API和具有对话记忆功能。


七、ChatPDF APP
我们前面有介绍过很多种实现文档聊天的方案,比如 **Quivr结合Supabase、PrivateGPT、ChatGLM 6B** 等多种不同的解决方案,基本上都涉及到不同程度的应用开发,今天我们来使用Flowise无代码快速构建一个PDF文档聊天机器人。不写一句代码,直接拖拉拽的方式即可实现类似的效果。

根据上述文档问答的流程架构图,我们在Flowise中将上述流程配置出来,如下图所示:

只需要配置好OpenAI key、设置Chunk Size、Chunk Overlap即可进行使用。


八、总结
**Flowise**
和 **LangChain** 是两个基于LLM(大型语言模型)的应用构建工具。本文主要介绍了如何利用Flowise和LangChain快速构建LLM应用。
通过结合Flowise和LangChain,开发者可以快速构建基于LLM的自然语言处理应用,实现文本分析、问答、文本生成等功能。Flowise提供了易用的界面和丰富的API接口,帮助开发者快速将自然语言处理任务集成到应用中。LangChain提供了多语言支持和统一的平台,帮助开发者在多个语言和领域中实现自然语言处理应用。结合Flowise和LangChain,开发者可以更加高效地构建基于LLM的自然语言处理应用,为用户提供更加智能和便捷的服务。